Conservative Multi-User Delegated Staking
Product value proposition
An end-user staking product with a conservative, validation-based APR and a user-friendly interface that can be embedded into your own or a partner’s distribution channel.
Product characteristics
| Parameter | Value |
|---|---|
| Number of stakers | Multiple |
| stETH minting capability | No |
Building blocks
| Building block | Solution | Implementation |
|---|---|---|
| Basis | stVault | Out-of-the-box |
| Pooling Wrapper | DeFi Wrapper | Out-of-the-box |
| User Interface | DeFi Wrapper Embeddable Widget / Custom | Out-of-the-box / Custom |
What is DeFi Wrapper?
The DeFi Wrapper is a no-/low-code toolkit that lets builders, Node Operators, and platforms launch customized user-facing staking products powered by stVaults — with optional automated APR-boosting strategies such as leverage loops or any custom stETH-based yield module.
This guide walks through the concepts and practical steps to launch such a product without deep protocol knowledge.
Architecture
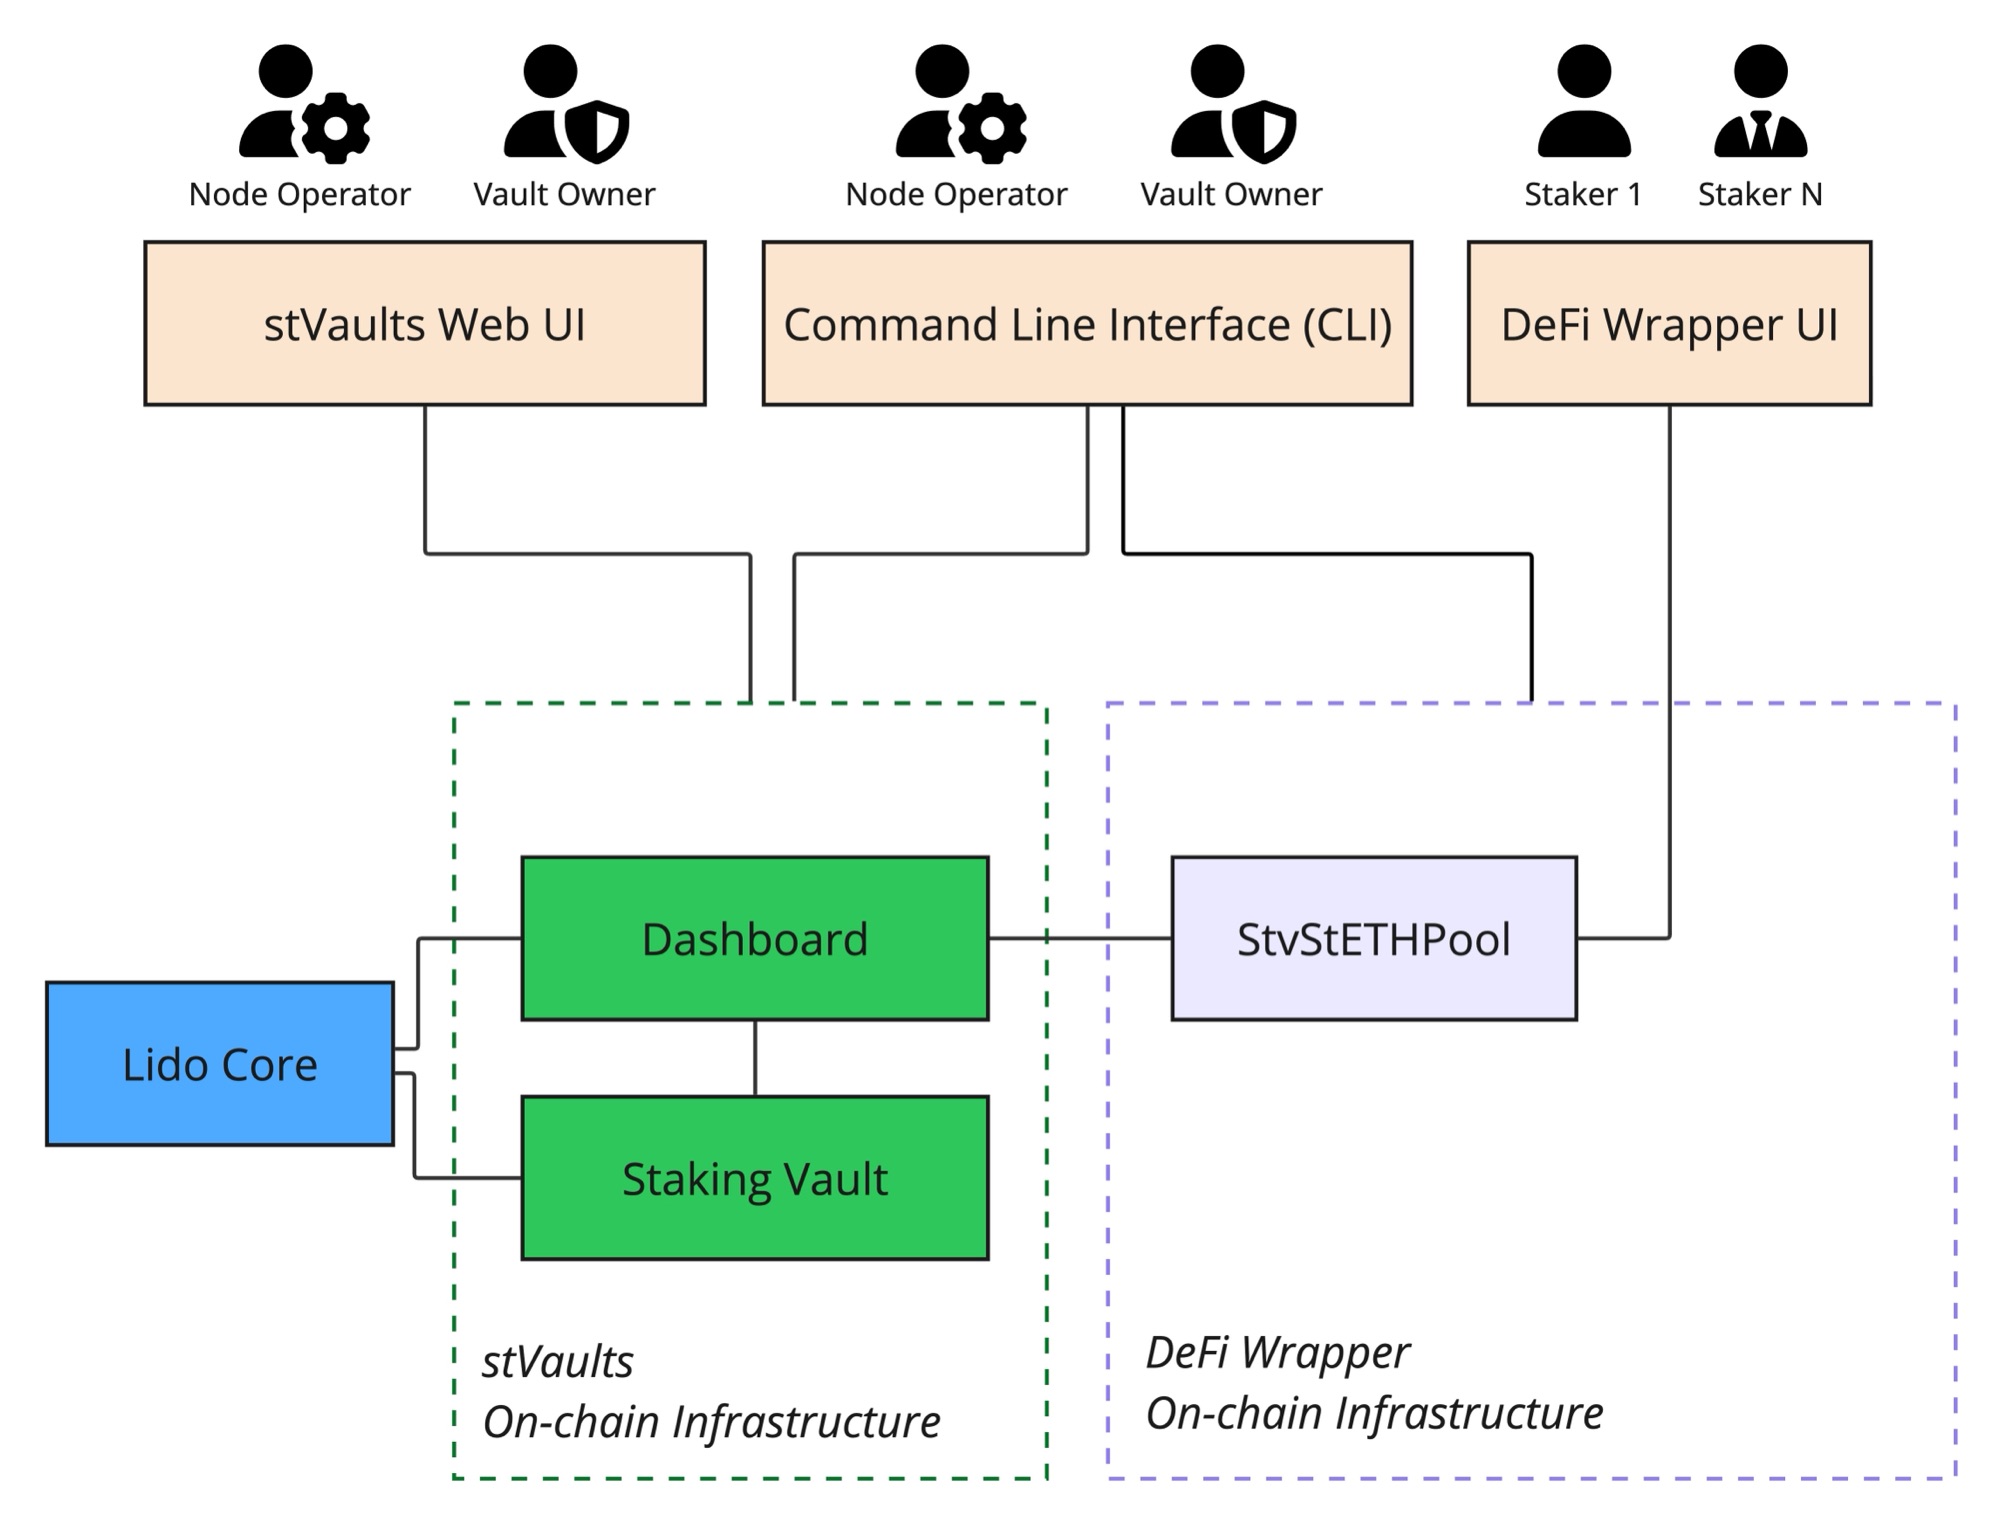
Steps
➡️ URLs and Smart Contract addresses are listed on Environments
1. Create a tokenized staking vault (pool)
The easiest way to create a tokenized staking vault (pool) is to use the stVaults CLI.
It's a command-line tool for managing both staking vaults and DeFi Wrapper pools. It deploys a pool plus its underlying staking vault via the Factory contract.
The CLI performs the deployment in two transactions to stay within the current 16M transaction gas limit.
To start:
- Set up the CLI according to the README.
- Prepare a valid CLI configuration — see the configuration tutorial.
The deployer must have at least 1 ETH available. This is the CONNECT_DEPOSIT required to be locked on the stVault upon connection to Lido VaultHub.
The newly created staking vault is automatically connected to Lido VaultHub and placed into the default tier. Placement into non-default tiers right upon deployment is not supported.
To list the available pool types and creation commands, run:
yarn start defi-wrapper contracts factory write -h
For each pool type, the CLI prints the environment variables required for the UI setup. Keep this output if you plan to set up the UI.
Deployment of StvPool (pool without stETH minting)
Run yarn start defi-wrapper contracts factory write create-pool-stv -h for the description of the required STV pool parameters.
Start the deployment like:
yarn start defi-wrapper contracts factory w create-pool-stv <DEFI_WRAPPER_FACTORY> \
  --nodeOperator 0x0000000000000000000000000000000000000001 \
  --nodeOperatorManager 0x0000000000000000000000000000000000000002 \
  --nodeOperatorFeeRateBP 10 \
  --confirmExpiry 86400 \
  --minDelaySeconds 3600 \
  --minWithdrawalDelayTime 3600 \
  --name "Debug STV Pool" \
  --symbol STV \
  --proposer 0x0000000000000000000000000000000000000003 \
  --executor 0x0000000000000000000000000000000000000004 \
  --emergencyCommittee 0x0000000000000000000000000000000000000005 \
  --allowList false
Deployment of StvStETHPool (pool with stETH minting)
Run yarn start defi-wrapper contracts factory write create-pool-stv-steth -h for the description of the required STV pool parameters.
Start the deployment like:
yarn start defi-wrapper contracts factory w create-pool-stv-steth <DEFI_WRAPPER_FACTORY> \
  --nodeOperator 0x0000000000000000000000000000000000000001 \
  --nodeOperatorManager 0x0000000000000000000000000000000000000002 \
  --nodeOperatorFeeRateBP 10 \
  --confirmExpiry 86400 \
  --minDelaySeconds 3600 \
  --minWithdrawalDelayTime 3600 \
  --name "Debug STV Pool" \
  --symbol STV \
  --proposer 0x0000000000000000000000000000000000000003 \
  --executor 0x0000000000000000000000000000000000000004 \
  --emergencyCommittee 0x0000000000000000000000000000000000000005 \
  --reserveRatioGapBP 250 \
  --allowList false
The minimum recommended value for reserveRatioGapBP is 250 (2.5%). It is expected to be sufficient to absorb enough of the stVault's performance volatility to keep users' positions healthy in most cases.
2. Create Web UI
Follow this guide to:
- Clone the provided repository
- Use addresses outputted by CLI to fill up
.env - Adjust titles, logos, texts, and color scheme to your liking
- Deploy the dApp
Adjust stETH minting parameters
By default, a newly created stVault is connected to the Default tier with a Reserve Ratio of 50%. If the Node Operator has passed identification and been granted individual tiers, the stVault can be moved from the Default tier to one of the Node Operator’s tiers to access better stETH minting conditions.
For more information about how this process works for the Basic stVault, please follow Adjust stETH minting parameters.
For stVaults with DeFi Wrapper the process of changing tier is a bit different because the Vault Owner role is assigned to the Timelock contract. The Timelock contract itself implements a two-step process for performing an on-chain action. First, the holder of its proposer role creates a proposed on-chain action; second, after a time period, the holder of the executor role executes it.
Thus, changing tier for a pooled vault is a three-step process:
- Holder of the Timelock's proposer role calls
TimelockController.scheduleto propose theDashboard.changeTiercall - After the timelock period, the holder of the Timelock's executor role calls
TimelockController.executefor the scheduled proposal - Within the
OperatorGridconfirmation expiry (currently 24 hours), the Node Operator confirms from their side by callingOperatorGrid.changeTier(vault, tierId, requestedShareLimit)— the same tier and share limit, but through a different contract and with the stVault as an extra argument
Confirming tier change request requires applying fresh report to vault. Read more about applying reports
Parameters needed for this step:
VaultAddress: the address of theVaultcontract.TierID: the ID of the tier to which the stVault will be connected.RequestedShareLimit: the requested absolute stETH minting limit for the stVault, expressed in shares. This value cannot exceed the tier's stETH limit.TimelockAddress: the address of theTimelockControllercontract (deployed together with the pool).OperatorGridAddress: the address of theOperatorGridcontract (available in the stVaults contract addresses list, see Environments).
How to determine available tier IDs for your Node Operator
To find out which tier IDs are available for your Node Operator, you can use:
CLI:
# Get group information for your Node Operator (shows all available tier IDs)
yarn start contracts operator-grid r group <nodeOperatorAddress>

# Get information about a specific tier
yarn start contracts operator-grid r tier <tierId>
Contract call (Etherscan):
- Navigate to the
OperatorGridcontract address - Go to Contract → Read Contract
- Call
group(nodeOperatorAddress)to get theGroupstruct, which includes thetierIdsarray - Call
tier(tierId)to get details about a specific tier
The group method returns a struct containing:
operator: Node operator addressshareLimit: Maximum liability shares across all group vaultsliabilityShares: Current liability shares in the grouptierIds: Array of tier IDs belonging to this Node Operator
Step 1: Schedule the tier change (Proposer)
CLI
Use --wallet-connect option for all commands or provide private key to CLI .env
- Get address of your timelock contract:
yarn start defi-wrapper use-cases timelock-governance common read get-timelock-address <poolAddress> - Connect wallet that holds the proposer role to CLI
- Propose change tier
yarn start defi-wrapper use-cases timelock-governance dashboard write propose-change-tier <timelockAddress> <dashboard> <tierId> <shareLimit>
Etherscan
- Open Etherscan and navigate to the TimelockController contract — find its address on the Per-setup addresses page.
- Go to the Contract tab → Write Contract.
- Click Connect to Web3 and connect the wallet that holds the proposer role.
- Find the
schedulemethod in the list and fill out the fields:target: theDashboardcontract address.value:0(no ETH is sent with this call).data: the ABI-encoded call tochangeTier(uint256 tierId, uint256 requestedShareLimit). You can generate this using tools like ABI Encoder or cast from Foundry:cast calldata "changeTier(uint256,uint256)" <TierID> <RequestedShareLimit>predecessor:0x0000000000000000000000000000000000000000000000000000000000000000(no predecessor required).salt:0x0000000000000000000000000000000000000000000000000000000000000000(or any unique value if you need to differentiate identical operations).delay: the delay in seconds (must be at least theminDelaySecondsconfigured during pool deployment).
- Click Write and sign the transaction in your wallet.
- Click View your transaction and wait for it to be executed.
- Note down the operation ID from the
CallScheduledevent in the transaction logs — you will need it to verify the operation status before execution.
Step 2: Execute the scheduled tier change (Executor)
CLI
-
Check the timelock delay period:
# Get timelock address
yarn start defi-wrapper use-cases timelock-governance common read get-timelock-address <poolAddress>

# Then get the minimum delay (replace <timelockAddress> with the address from previous command)
yarn start defi-wrapper use-cases timelock-governance common read get-min-delay <timelockAddress> -
Wait for the timelock delay period to pass. You can verify the operation is ready by calling
yarn start defi-wrapper use-cases timelock-governance common read get-last-operations <timelockAddress> -
Connect wallet that holds the executor role to CLI
-
Execute change tier
yarn start defi-wrapper use-cases timelock-governance dashboard write execute-change-tier <timelockAddress> <dashboard> <tierId> <shareLimit>
Etherscan
-
Check the timelock delay period:
- Open Etherscan and navigate to the TimelockController contract — find its address on the Per-setup addresses page.
- Go to the Contract tab → Read Contract.
- Find the
getMinDelaymethod and click Query to see the minimum delay in seconds.
-
Wait for the timelock delay period to pass. You can verify the operation is ready by calling
isOperationReady(operationId)on the TimelockController contract (in Read Contract tab). -
Execute change tier, connect the wallet:
- Open Etherscan and navigate to the TimelockController contract — find its address on the Per-setup addresses page.
- Go to the Contract tab → Write Contract.
- Click Connect to Web3 and connect the wallet that holds the executor role.
-
Find the
executemethod in the list and fill out the fields with the same values used in theschedulecall:target: theDashboardcontract address.value:0.payload: the same ABI-encoded call data used in step 1.predecessor:0x0000000000000000000000000000000000000000000000000000000000000000.salt: the same salt value used in step 1.
-
Click Write and sign the transaction in your wallet.
-
Click View your transaction and wait for it to be executed.
Step 3: Confirm the tier change (Node Operator)
Within the OperatorGrid confirmation expiry (currently 24 hours) after step 2, the Node Operator must confirm the tier change:
stVaults UI
- Go to
https://stvaults.lido.fi/vaults/[vaultAddress]/settings/tier - Connect wallet that has Node operator address
- Follow UI to confirm tier change
CLI
- Connect wallet that has Node operator address to CLI
yarn start vo w change-tier-by-no -v <vaultAddress> -r <requestedShareLimit> <tierId>
Etherscan
- Open Etherscan and navigate to the OperatorGrid contract by its address (available in the stVaults contract addresses list, see Environments).
- Since this contract is a proxy, complete the verification steps once (if not done before):
- Go to Contract → Code.
- Click More options.
- Select Is this a proxy?.
- Click Verify in the dialog.
- Return to the contract details page.
- Open the Contract tab → Write as Proxy.
- Click Connect to Web3 and connect the wallet registered as the Node Operator.
- Find the
changeTiermethod in the list and fill out the fields with the same values used in steps 1 and 2:vault: theVaultcontract address.tierId: the tier ID.requestedShareLimit: the requested share limit.
- Click Write and sign the transaction in your wallet.
- Click View your transaction and wait for it to be executed.