🧱 Basic stVault with optional liquidity
Intro
This guide is aimed at helping Node Operators, Builders, Protocols, and Liquidity Providers create and operate an stVault with optional liquidity.
Product value proposition
Competitive offering to native staking — users stake with the same Node Operator and get optional liquidity through stETH.
The vault strategy
ETH is deposited to validators and generates staking rewards; stETH is minted on demand by the Vault Owner.
Environments
Testnet
- UI: https://stvaults-hoodi.testnet.fi/
- CLI: https://lidofinance.github.io/lido-staking-vault-cli/get-started/configuration
- Contracts: Hoodi Testnet
- Etherscan: https://hoodi.etherscan.io/
Mainnet
- UI: https://stvaults.lido.fi/ (will be available on Phase 2 of the Rollout plan)
- CLI: https://lidofinance.github.io/lido-staking-vault-cli/get-started/configuration
- Contracts: Mainnet
- Etherscan: https://etherscan.io/
Steps
Create an stVault
Creating an stVault is permissionless. There are two main ways to do it:
- Two-step process (recommended): initiated by the Node Operator and completed by the Vault Owner.
- One-step process (for experienced Vault Owners / Stakers): create the stVault and supply 1 ETH in a single transaction.
Parameters needed to create an stVault:
- Node Operator address — a unique, immutable identifier of the Node Operator within stVaults, used in protocol logic such as calculating per-operator stETH minting terms and limits. It designates the Node Operator that provides validation services for the stVault and also manages ETH deposits from the stVault balance to validators, as well as handling validator exits when required.
- Node Operator Manager address. One of the two administrative roles in an stVault. From the Node Operator perspective, this role manages permissions and can update key vault parameters. Multiple addresses are supported.
- Vault Owner address. One of the two administrative roles in an stVault. From the Vault Owner (Staker) perspective, this role manages permissions and can update key vault parameters. Multiple addresses are supported.
- Node Operator Fee. The share of gross staking rewards that the Node Operator charges for providing validation services. Expressed in basis points [0 (0%) .. 10,000 (100%)].
- Confirmation Lifetime. The key parameter of the multi-role confirmation mechanism. It defines the maximum time interval between proposal and confirmation. This mechanism is used to update certain stVault parameters by requiring consensus between the two stVault representatives: the Vault Owner and the Node Operator Manager. Measured in seconds [86,400 sec (24 hours) .. 25,920,000 sec (30 days)]. For security reasons, it is strongly recommended to keep it as short as possible, ideally the minimum 86,400 sec.
1. Two-step process (recommended)
This approach enables a Node Operator to create an stVault without providing their own ETH. It is recommended because it prevents ETH commingling and streamlines the experience for Stakers and Vault Owners.
1.1. Node Operator creates an stVault that is not yet connected to Lido Core.
Creating an stVault is a permissionless operation, but in this two-step process it is usually performed by the Node Operator.
by Command-line Interface
yarn start vo w create-vault create-without-connecting --defaultAdmin <VaultOwnerAddress> --nodeOperator <NodeOperatorAddress> --nodeOperatorManager <NodeOperatorManagerAddress> --confirmExpiry <TimeInSeconds> --nodeOperatorFeeRateBP <NodeOperatorFeeInBasisPoints> 1
Note down the addresses of the created Vault and Dashboard contracts — these are the key contracts of your newly created stVault.
using Etherscan UI
- Open Etherscan and navigate to the VaultFactory contract by its address (available in the stVaults contract addresses list, see #Environments).
- Go to the Contract tab → Write Contract.
- Click Connect to Web3 and connect your wallet in the dialog window.
- Find the method
createVaultWithDashboardWithoutConnectingToVaultHubin the list, fill out the fields, and click Write.- You can leave
_roleAssignments = [].
- You can leave
- Sign the transaction in your wallet.
- Click View your transaction and wait for it to be executed.
- Open the Logs tab, scroll to the DashboardCreated event, and note down the addresses of the created Vault and Dashboard contracts — these are the key contracts of your newly created stVault.
1.2. When an stVault is created, the Node Operator may optionally propose a tier with more favorable stETH minting terms than the Default tier.
To perform this step, the Node Operator of the newly created vault must already have individual tiers assigned. Otherwise, the stVault will remain limited to the Default tier option (tierID = 0).
Parameters needed for this step:
VaultAddress: the address of theVaultcontract.TierID: the ID of the tier to which the stVault will be connected.RequestedShareLimit: the requested absolute stETH minting limit for the stVault, expressed in shares. This value cannot exceed the tier’s stETH limit. Learn more about shares and stETH / wstETH tokens.
by Command-line Interface
yarn start contracts operator-grid w ct <VaultAddress> <TierID> <RequestedShareLimit>
using Etherscan UI
- Open Etherscan and navigate to the Operator Grid contract by its address (available in the stVaults contract addresses list, see #Environments).
- Since this contract is a proxy, complete the verification steps once (if not done before):
- Go to Contract → Code.
- Click More options.
- Select Is this a proxy?.
- Click Verify in the dialog.
- Return to the contract details page.
- Open the Contract tab → Write as Proxy.
- Click Connect to Web3 and connect your wallet in the dialog window.
- Find the
changeTiermethod in the list, fill out the fields, and click Write. - Sign the transaction in your wallet.
- Click View your transaction and wait for it to be executed.
1.3. After that, the Vault Owner, in one transaction, accepts the stETH minting parameters and fees (by accepting the tier), supplies 1 ETH as collateral for connection to Lido Core, and initiates the connection to Lido Core.
This is a permissioned operation. By default, this permission belongs to the Vault Owner, who can delegate it to other addresses (multiple supported, including the Vault Owner’s own address). Read more about roles.
Parameters and addresses needed for this step:
VaultAddress: the address of theVaultcontract.TierID: the ID of the tier to which the stVault will be connected.RequestedShareLimit: the requested absolute stETH minting limit for the stVault, expressed in shares. This value cannot exceed the tier’s stETH limit. Learn more about shares and stETH / wstETH tokens.payableAmount: the amount of ETH to supply in the same transaction; minimum is 1 ETH.currentSettledGrowth: the amount of unaccounted growth accrued on the vault while it was disconnected; 0 for newly created vaults via the create-without-connecting method. Settled growth is the part of the total growth that has already been charged by the node operator or is not subject to fee (exempted), such as unguaranteed or side deposits, and consolidations accrued while the vault was disconnected.
using stVaults Web UI
-
Open the stVaults mainpage (see #Environments)
-
Connect wallet on the "My Vaults" page.
-
Open an stVault overview page at
https://<domain>/vaults/<StakingVaultAddress>
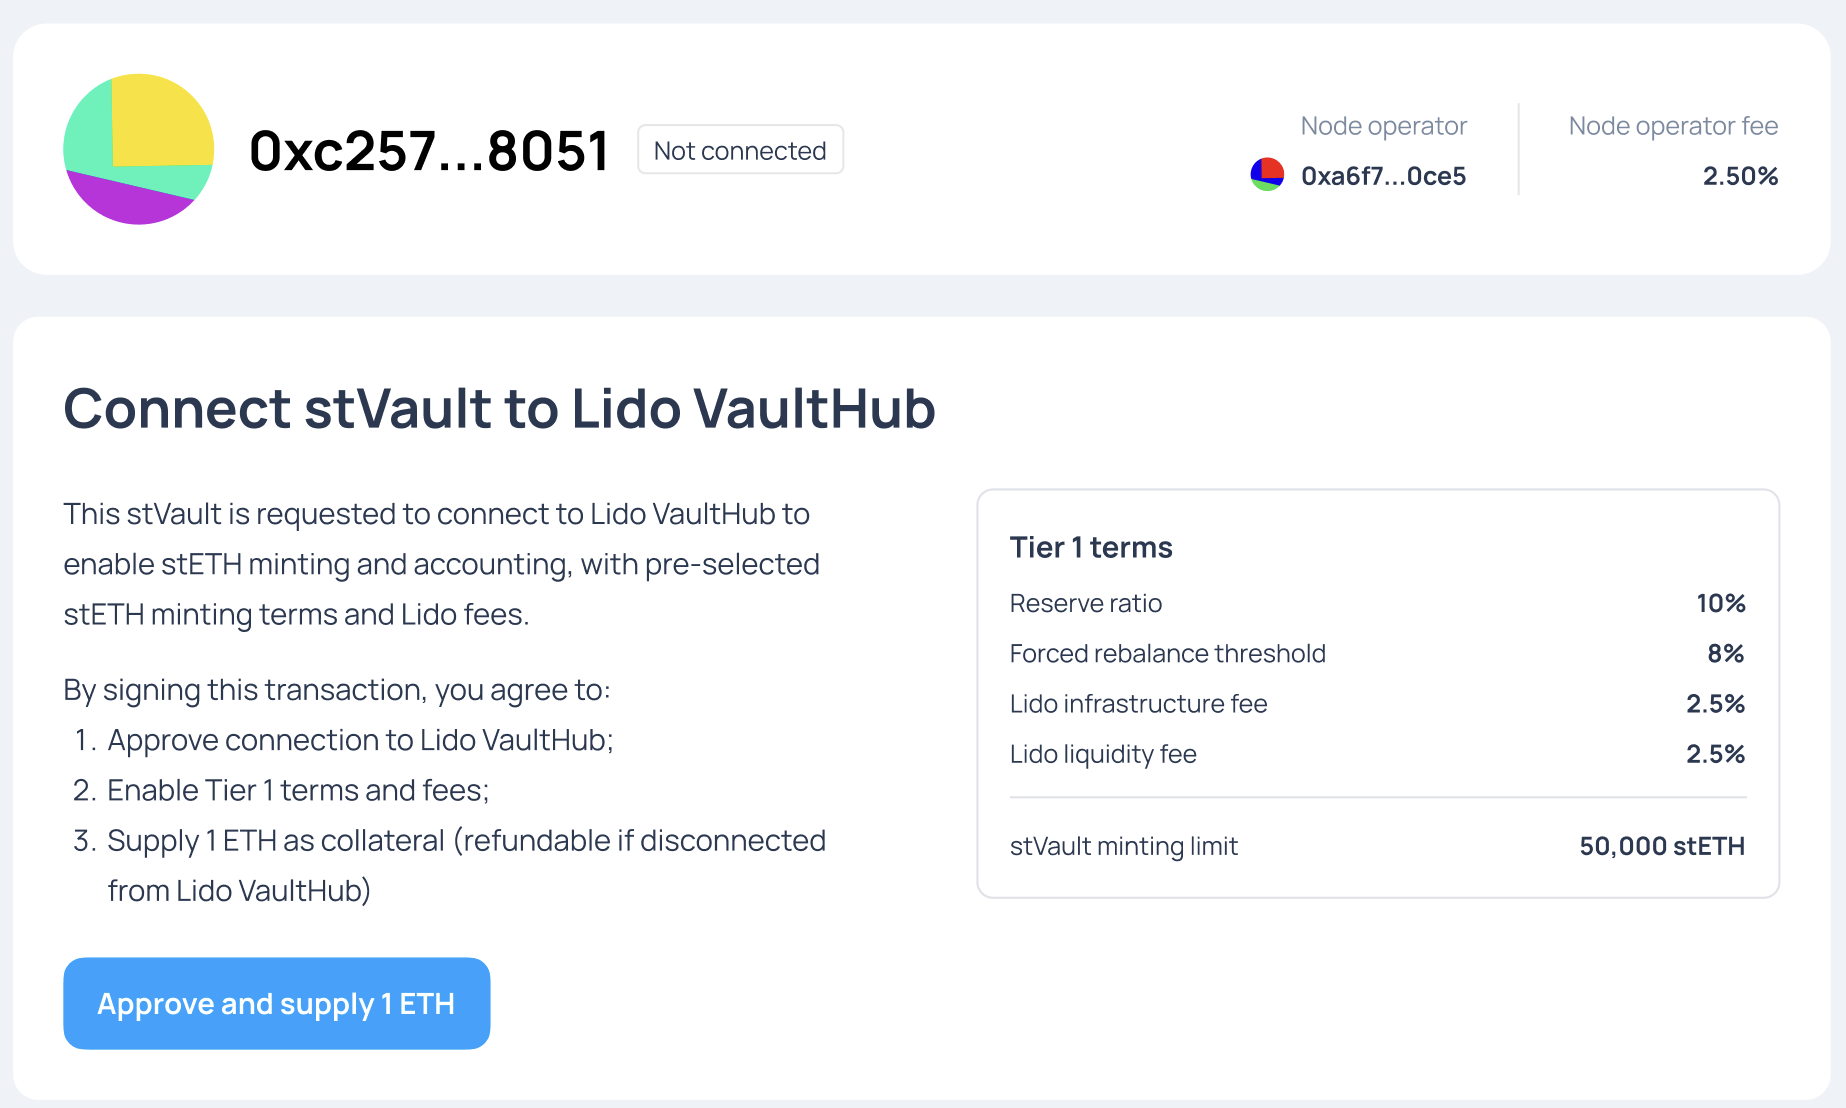
-
Review parameters and click "Approve and supply 1 ETH".
-
Sign transaction in the wallet.
by Command-line Interface
yarn start contracts dashboard w connect-and-accept-tier -f <DashboardAddress> <TierID> <RequestedShareLimit>
using Etherscan UI
- Open Etherscan and navigate to the Dashboard contract by its address (provided in the results of stVault creation, see step 1.1).
- Since this contract is a proxy, complete the verification steps once (if not done before):
- Go to Contract → Code.
- Click More options.
- Select Is this a proxy?.
- Click Verify in the dialog.
- Return to the contract details page.
- Open the Contract tab → Write as Proxy.
- Click Connect to Web3 and connect your wallet in the dialog window.
- Find the
connectAndAcceptTiermethod in the list, fill out the fields, and click Write.- fill out the
payableAmountfield with '1' to supply1 ETHin the same transaction. - set the
_currentSettledGrowthfield to '0' for a newly created vault like in this scenario (if the stVault is newly created but had side deposits before connecting, settled growth must be set accordingly before the connection).
- fill out the
- Sign the transaction in your wallet.
- Click View your transaction and wait for it to be executed.
2. One-step process (for experienced Vault Owners / Stakers)
In this approach, the Vault Owner creates an stVault that automatically connects to Lido Core, enabling stETH minting. This requires supplying 1 ETH, which will be locked as collateral for the connection to Lido Core. All completed in a single transaction, so despite being a permissionless operation, it is usually performed by the Vault Owner of the future stVault.
using stVaults Web UI
- Open the stVaults mainpage (see #Environments)
- Connect wallet on the "My Vaults" page.
- Click "Create vault".
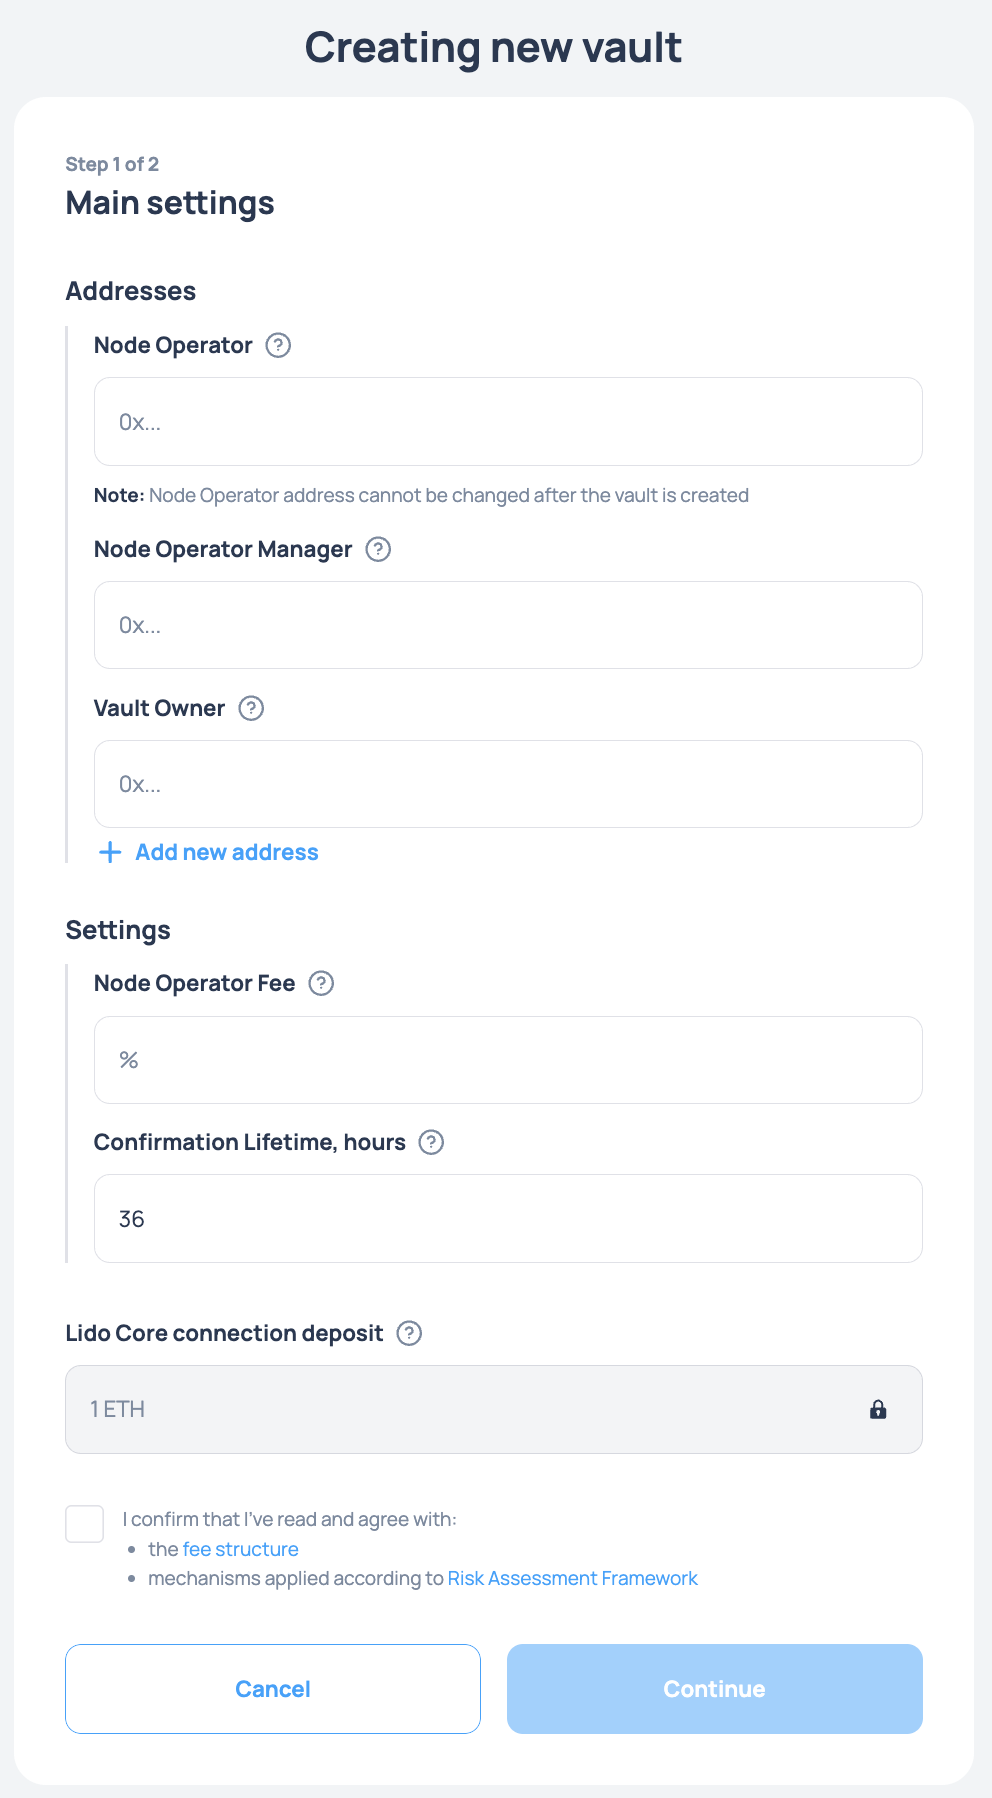
- Fill out the form and click "Continue".
- Sign transaction in the wallet.
by Command-line Interface
yarn start vo w create-vault create --defaultAdmin <VaultOwnerAddress> --nodeOperator <NodeOperatorAddress> --nodeOperatorManager <NodeOperatorManagerAddress> --confirmExpiry <TimeInSeconds> --nodeOperatorFeeRateBP <NodeOperatorFeeInBasisPoints> 1
using Etherscan UI
- Open Etherscan and navigate to the VaultFactory contract by its address (available in the stVaults contract addresses list, see #Environments).
- Go to the Contract tab → Write Contract.
- Click Connect to Web3 and connect your wallet in the dialog window.
- Find the method
createVaultWithDashboardin the list, fill out the fields, and click Write._payableAmount (ether)must be at least 1 ETH.- You can leave
_roleAssignments = [].
- Sign the transaction in your wallet.
- Click View your transaction and wait for it to be executed.
- Open the Logs tab, scroll to the DashboardCreated event, and note down the addresses of the created Vault and Dashboard contracts — these are the key contracts of your newly created stVault.
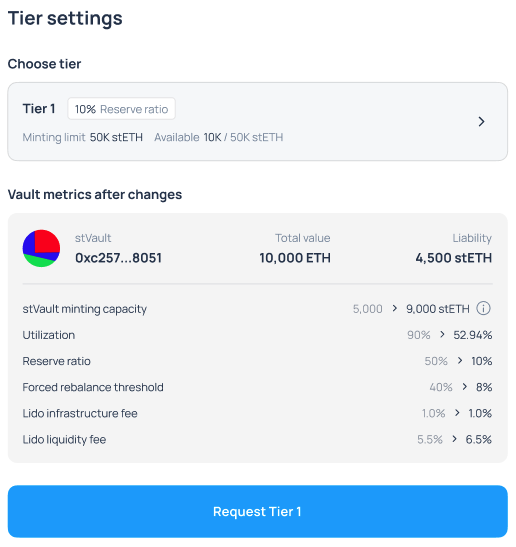
Adjust stETH minting parameters
By default, a newly created stVault is connected to the Default tier with a Reserve Ratio of 50%. If the Node Operator has passed identification and been granted individual tiers, the stVault can be moved from the Default tier to one of the Node Operator’s tiers to access better stETH minting conditions.
When using vault creation method #1 ("Two-step process"), the Node Operator and Vault Owner can set up the stVault with the desired stETH minting parameters from the start. Otherwise, the tier can be changed afterwards.
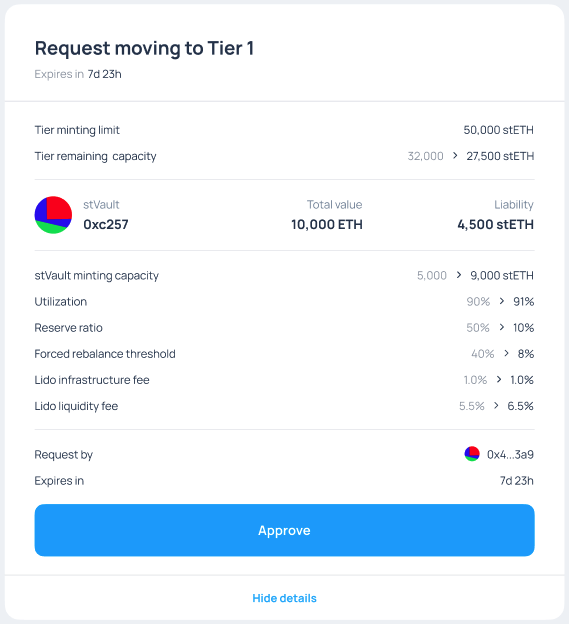
Tier changes are performed via a multi-role confirmation mechanism, where the Node Operator and Vault Owner act as contracting parties. One party proposes the change, and the other party accepts it. Technically, both requests are made through the same method: changeTier(tierId, requestedShareLimit).
Both parties must submit the request with identical parameters within the confirmation lifetime of 24 hours for the change to take effect.
Addresses performing this operation must have the following roles (Read more about roles):
- From the Vault Owner: Vault Owner (Admin DEFAULT_ADMIN_ROLE, or delegated VAULT_CONFIGURATION_ROLE).
- From the Node Operator: Node Operator (registered in the
OperatorGridcontract).
Confirming tier change request requires applying fresh report to vault. Read more about applying reports
Parameters and addresses needed for this step (for CLI and Smart contracts):
VaultAddress: the address of theVaultcontract.TierID: the ID of the tier to which the stVault will be connected.RequestedShareLimit: the requested absolute stETH minting limit for the stVault, expressed in shares. This value cannot exceed the tier’s stETH limit. Learn more about shares and stETH / wstETH tokens.
using stVaults Web UI
- On behalf of the first contracting party, open 'Settings > Tiers', and click the tier selector:
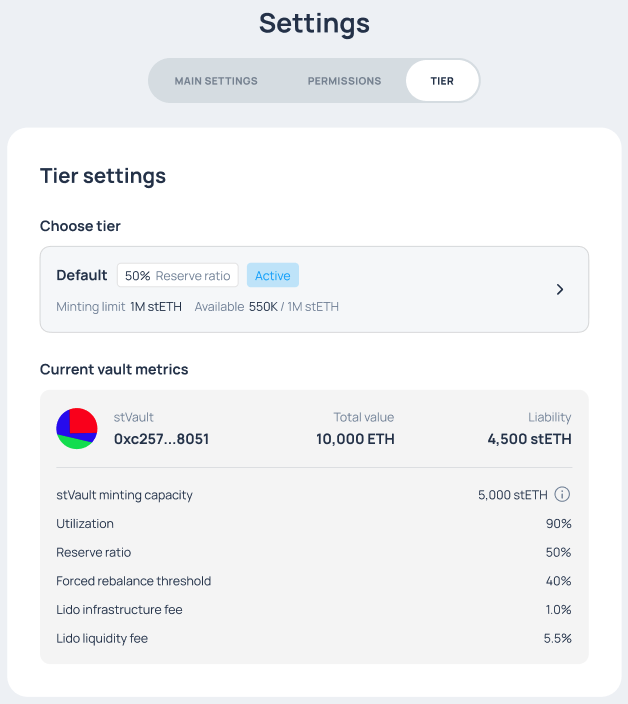
- Select the desired tier from the list:
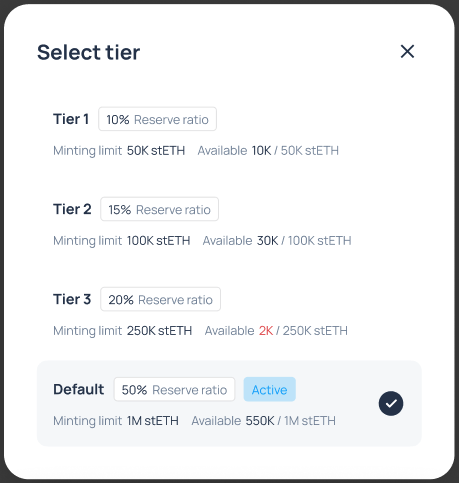
- Review how the stVault metrics will change after moving to the new tier, then submit your request/proposal.
- On behalf of the other contracting party, open 'Settings > Tiers'.
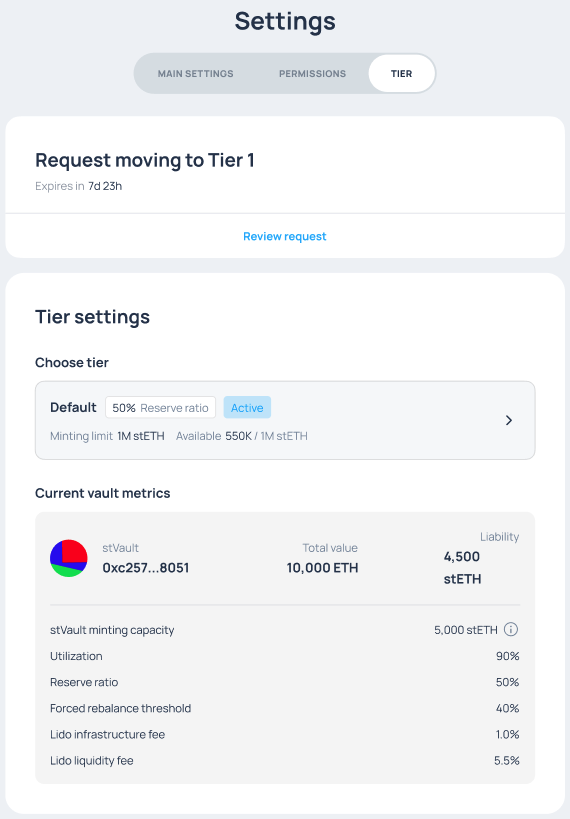
- Open the request details, review the projected changes to the stVault metrics, and submit approval.
by Command-line Interface
On behalf of the Vault Owner (details and examples):
yarn start vo w change-tier -v <vaultAddress> -r <requestedShareLimit> <tierId>
On behalf of the Node Operator (details and examples):
yarn start vo w change-tier-by-no -v <vaultAddress> -r <requestedShareLimit> <tierId>
using Etherscan UI
The Node Operator and Vault Owner use same-named methods in different contracts to perform this change.
Node Operator:
- Open Etherscan and navigate to the Operator Grid contract by its address (available in the stVaults contract addresses list, see #Environments).
- Since this contract is a proxy, complete the verification steps once (if not done before):
- Go to Contract → Code.
- Click More options.
- Select Is this a proxy?.
- Click Verify in the dialog.
- Return to the contract details page.
- Open the Contract tab → Write as Proxy.
- Click Connect to Web3 and connect your wallet in the dialog window.
- Find the
changeTiermethod in the list, fill out the fields, and click Write. - Sign the transaction in your wallet.
- Click View your transaction and wait for it to be executed.
Vault Owner:
- Open Etherscan and navigate to the Dashboard contract by its address (provided in the results of stVault creation, see step 1.1).
- Since this contract is a proxy, complete the verification steps once (if not done before):
- Go to Contract → Code.
- Click More options.
- Select Is this a proxy?.
- Click Verify in the dialog.
- Return to the contract details page.
- Open the Contract tab → Write as Proxy.
- Click Connect to Web3 and connect your wallet in the dialog window.
- Find the
changeTiermethod in the list, fill out the fields, and click Write. - Sign the transaction in your wallet.
- Click View your transaction and wait for it to be executed.
Supply and withdraw ETH
Supply and Withdraw ETH are permissioned operations. By default, these permissions belong to the Vault Owner, who can delegate them to other addresses (multiple are supported, including the Vault Owner’s own address). Read more about roles.
Before withdrawing ETH or performing other operations that depend on current vault state, ensure that a fresh report for your vault is applied. Read more about applying reports
Withdrawable ETH is defined by (Read more about stVaults metrics):
- stVault Balance - ETH that is not staked on validators.
- Total lock — collateral reserved for stETH liability, the mandatory 1 ETH minimal reserve for connecting the stVault to Lido Core, and protocol and Node Operator fee obligations.
using stVaults Web UI
Supply / Withdraw section:
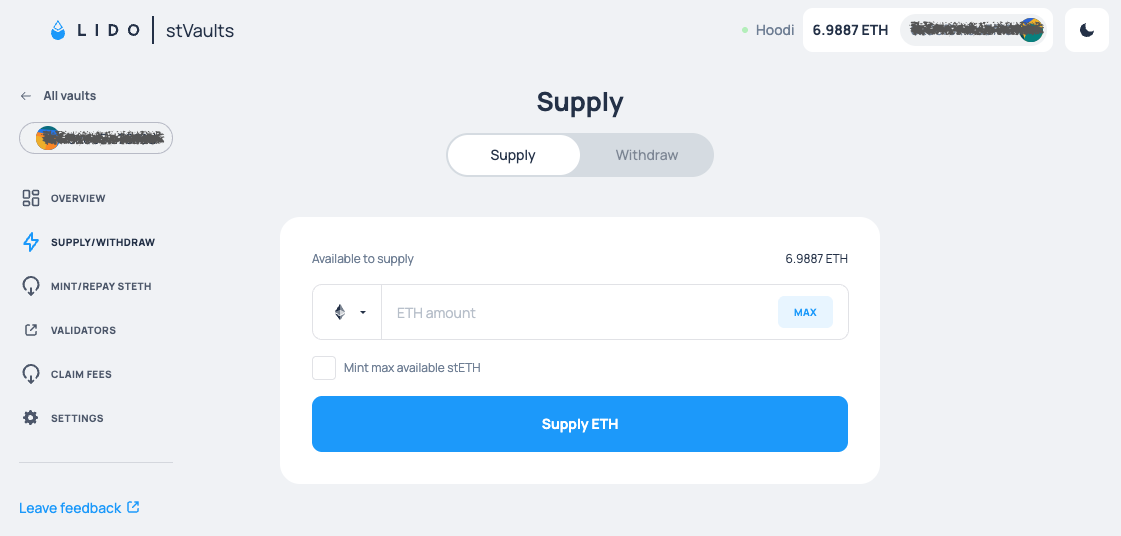 When supplying, you can mint all amount of available stETH immediately by selecting the checkbox.
When withdrawing, you can specify a destination address for the withdrawal. You can also choose which token to supply or withdraw: ETH or wETH.
When supplying, you can mint all amount of available stETH immediately by selecting the checkbox.
When withdrawing, you can specify a destination address for the withdrawal. You can also choose which token to supply or withdraw: ETH or wETH.
by Command-line Interface
Supply (fund) (details and examples):
yarn start vo w fund <amount>
Withdraw (details and examples):
yarn start vo w withdraw <amount>
using Etherscan UI
- Open Etherscan and navigate to the Dashboard contract by its address (provided in the results of stVault creation, see step 1.1).
- Since this contract is a proxy, complete the verification steps once (if not done before):
- Go to Contract → Code.
- Click More options.
- Select Is this a proxy?.
- Click Verify in the dialog.
- Return to the contract details page.
- Open the Contract tab → Write as Proxy.
- Click Connect to Web3 and connect your wallet in the dialog window.
- Find the required method in the list, fill out the fields, and click Write:
fundto supply (fund) ETH into the stVault.withdrawto withdraw ETH from the stVault balance (accepts wei for amount).
- Sign the transaction in your wallet.
- Click View your transaction and wait for it to be executed.
Mint and repay stETH
When ETH is supplied to an stVault, the Vault Owner can mint stETH on demand. Unlike Lido Core, stVaults allow stETH minting only within the defined stETH minting capacity.
Mint and Repay stETH are permissioned operations. By default, these permissions belong to the Vault Owner, who can delegate them to other addresses (multiple supported, including the Vault Owner’s own address). Read more about roles.
Before minting stETH or performing other operations that depend on current vault state, ensure that a fresh report for your vault is applied. Read more about applying reports
After stETH is repaid, the corresponding ETH is unlocked once the upcoming Oracle report confirms the repaid amount.
using stVaults Web UI
Mint / Repay section:
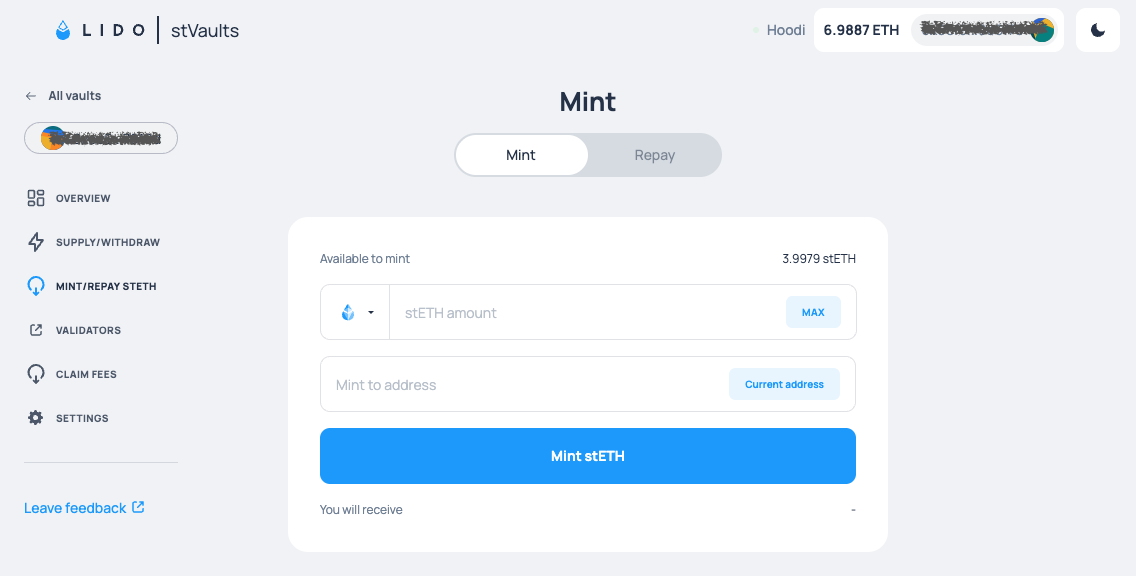 When minting stETH, you can specify an address to receive it. You can also choose which token to mint or repay: stETH or wstETH.
by Command-line Interface
Mint (details and examples):
- Mint Shares
yarn start vo w mint-shares <amount> - Mint stETH tokens (rebasing):
yarn start vo w mint-steth <amount> - Mint wrapped stETH tokens (non-rebasing):
yarn start vo w mint-wsteth <amount>
Repay (burn) (details and examples):
- Repay (burn) vault shares:
yarn start vo w burn <amount> - Repay (burn) stETH tokens:
yarn start vo w burn-steth <amount> - Repay (burn) wrapped stETH tokens:
yarn start vo w burn-wsteth <amount>
using Etherscan UI
- Open Etherscan and navigate to the Dashboard contract by its address (provided in the results of stVault creation, see step 1.1).
- Since this contract is a proxy, complete the verification steps once (if not done before):
- Go to Contract → Code.
- Click More options.
- Select Is this a proxy?.
- Click Verify in the dialog.
- Return to the contract details page.
- Open the Contract tab → Write as Proxy.
- Click Connect to Web3 and connect your wallet in the dialog window.
- Find the required method in the list, fill out the fields, and click Write:
mintSharesto mint shares;mintStETHto mint stETH token (rebasing);mintWstETHto mint the wrapped token wstETH (non-rebasing);burnSharesto repay (burn) shares;burnStETHto repay (burn) stETH token;burnWstETHto repay (burn) the wrapped token wstETH;
- Sign the transaction in your wallet.
- Click View your transaction and wait for it to be executed.
To repay (burn) shares, stETH or wstETH you must first grant approval to the vault's Dashboard contract. Go to the stETH or wstETH token contract and execute the approve() method for the amount (in wei) you want to set as allowance. Only after the approval is confirmed you can proceed with the repay (burn) operation. Please also note that if you are trying to mint shares (instead of stETH or wstETH), in that case you may need to approve slightly different amount of stETH then you are trying to mint. Please find the contracts' addresses on the Contracts page in accordance with your environment.
Deposit ETH to validators
Supplying ETH to the stVault increases its balance. The Node Operator can then deposit ETH from this balance into validators.
The Predeposit Guarantee (PDG) contract, as part of the stVaults platform, helps prevent deposit frontrunning caused by the vulnerabilities described in LIP-5. PDG secures the Vault Owner’s ETH deposits to validators from being front-run by the Node Operator.
One of the key benefits of using PDG is the avoidance of commingling: it keeps the finances of the Vault Owner and the Node Operator strictly separated.
PDG enables three main use cases:
- Full-cycle proof of validators. Enables a non-custodial deposit mechanism by using guarantee ETH as collateral. Follow the main guide.
- PDG shortcut. Allows skipping the pre-deposit steps and depositing directly to a validator without using PDG initially. The validator can later be associated with the vault by proving it through PDG. This path is applicable when there is unconditional trust between the Node Operator and the Vault Owner. Follow the shortcut guide.
- Adding existing validators. Lets you connect an existing validator from external staking infrastructure to an stVault as an advanced integration use case. Consolidations guide
Read more: Technical details; GitHub Repository.
Monitor stVault health and rebalance
The key stVault metrics that the Vault Owner should monitor and control are:
- Utilization ratio — the share of the stETH minting capacity currently used by the Vault Owner. Learn more
- Health Factor — a metric that reflects the economic state of the vault. It shows how the stETH liability is collateralized by the Total Value. A Health Factor of 100% corresponds to the Forced Rebalance Threshold, meaning that if the Health Factor falls below 100%, the stVault becomes subject to forced rebalancing. Learn more
Read more:
The Health Factor metric may decrease as a result of validator underperformance, penalties, or a slashing event.
If this happens, there are three main options available:
- Supply ETH to increase Total Value.
- Repay stETH to reduce stETH liability.
- Rebalance ETH (optionally combined with a supply in a single transaction).
Rebalancing involves transferring available ETH from the stVault balance to Lido Core, receiving stETH at a 1:1 ratio, and repaying it back to the stVault. This reduces stETH liability and thereby increases the Health Factor.
Rebalancing is performed in one transaction.
The amount of ETH required for rebalancing to bring the Utilization Ratio to 100% depends on the current Health Factor and Reserve Ratio. It can be pre-calculated manually using the formula, or via the built-in methods.
by Formula
ETH for rebalance = (stETH Liability − (1 − Reserve Ratio) × Total Value) / Reserve Ratio
by Command-line Interface
See the CLI documentation for rebalance commands.
using Etherscan UI
- Open Etherscan and navigate to the VaultHub contract by its address (available in the stVaults contract addresses list, see #Environments).
- Since this contract is a proxy, complete the verification steps once (if not done before):
- Go to Contract → Code.
- Click More options.
- Select Is this a proxy?.
- Click Verify in the dialog.
- Return to the contract details page.
- Open the Contract tab → Read as Proxy.
- Click Connect to Web3 and connect your wallet in the dialog window.
- Find the method
healthShortfallSharesin the list, fill out the input with thevaultcontract address, and click Query. - Receive the result right under the submit button.