CSM + DVT with Obol
Obol is an implementation of Distributed Validator Technology (DVT) that allows multiple operators to collaboratively run a validator as a cluster. This improves security, resilience, and decentralization, making it an ideal choice for home stakers who want to run validators as part of a group.
Why Lido CSM + Obol?
- Resilience: Multiple operators share validator keys; some can go offline without penalties.
- Security: An attacker needs multiple shards to compromise a cluster (vs 1 key in solo staking).
- Extra benefits: Obol credentials proving proficiency as a validator operator.
Video Guide
Preparation
Obol clusters can be formed with as few as 4 operators, but we recommend 7 operators as it's the minimum configuration to tolerate two malicious nodes.
Before creating a cluster:
- Appoint a cluster leader to coordinate setup.
- Collect wallet addresses of all cluster members.
- Create a Safe multi-sig wallet (
4/7or5/7threshold) → app.safe.global. - Create a Splitter contract with all members → splits.org.
- Each operator generates an Obol Ethereum Node Record (ENR) and backs it up securely.
- Decide how many validator keys to run based on available ETH bond for Lido CSM.
- Each operator also needs a full Ethereum node and MEV-Boost configured with Lido-vetted relays. Please refer to Node Setup to learn how.
1. Preparing Your Environment
Obol's client is named Charon, we will need this to use this to distribute keys and perform the actions as a group.
In this guide we will use a multi-container Docker setup that includes execution client, consensus client, MEV-Boost and the Charon client. Steps to use Obol with other integrations (e.g. Dappnode) differs in the installation of Charon, but are largely the same afterwards.
- Clone the Charon client repository and set up the environment:
git clone https://github.com/ObolNetwork/charon-distributed-validator-node.git
cd charon-distributed-validator-node
mkdir .charon
cp .env.sample.hoodi .env
- Ensure your user has Docker privileges:
sudo usermod -a -G docker $USER
After adding your user to the docker group, log out of your SSH session and reconnect.
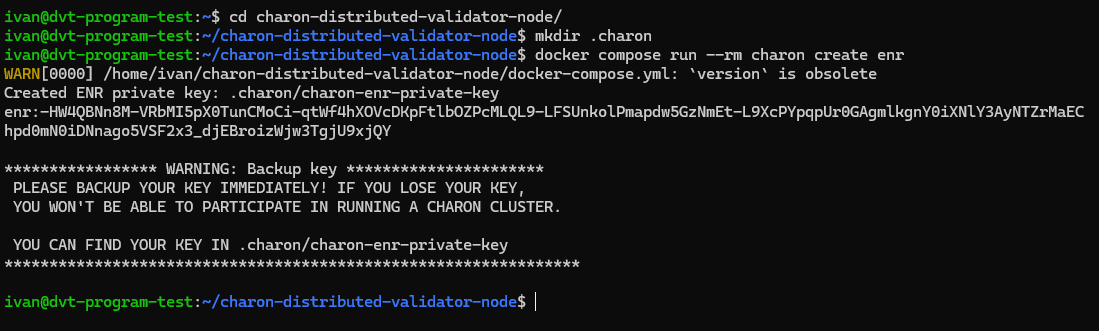
2. Generate Ethereum Node Records (ENR)
Each operator needs an ENR to identify themselves in the cluster, to generate use the following command:
docker compose run --rm charon create enr
Back up the ENR securely. It will be required during cluster setup.
3. Set up Cluster Management Contracts
Multi-sig Wallet
Create a Safe multi-sig wallet with all operators as signers:
- Hoodi Testnet Safe: app.safe.protofire.io/welcome
- Mainnet Safe: app.safe.global Set a signing threshold of 4/7 or 5/7.
Splitter Contract
Use app.splits.org to deploy a Splitter contract with all operator reward addresses.
- Select immutable option (recommended).
- Share the deployed contract address with all members.
4. Create a Cluster via Obol Launchpad
- Cluster leader opens the Launchpad:
- Mainnet: launchpad.obol.org
- Hoodi Testnet: hoodi.launchpad.obol.org
-
Select Create Cluster, review and accept advisories, and sign confirmations.
-
Configure:
- Cluster name & size
- Signer addresses of all members
- Number of validators
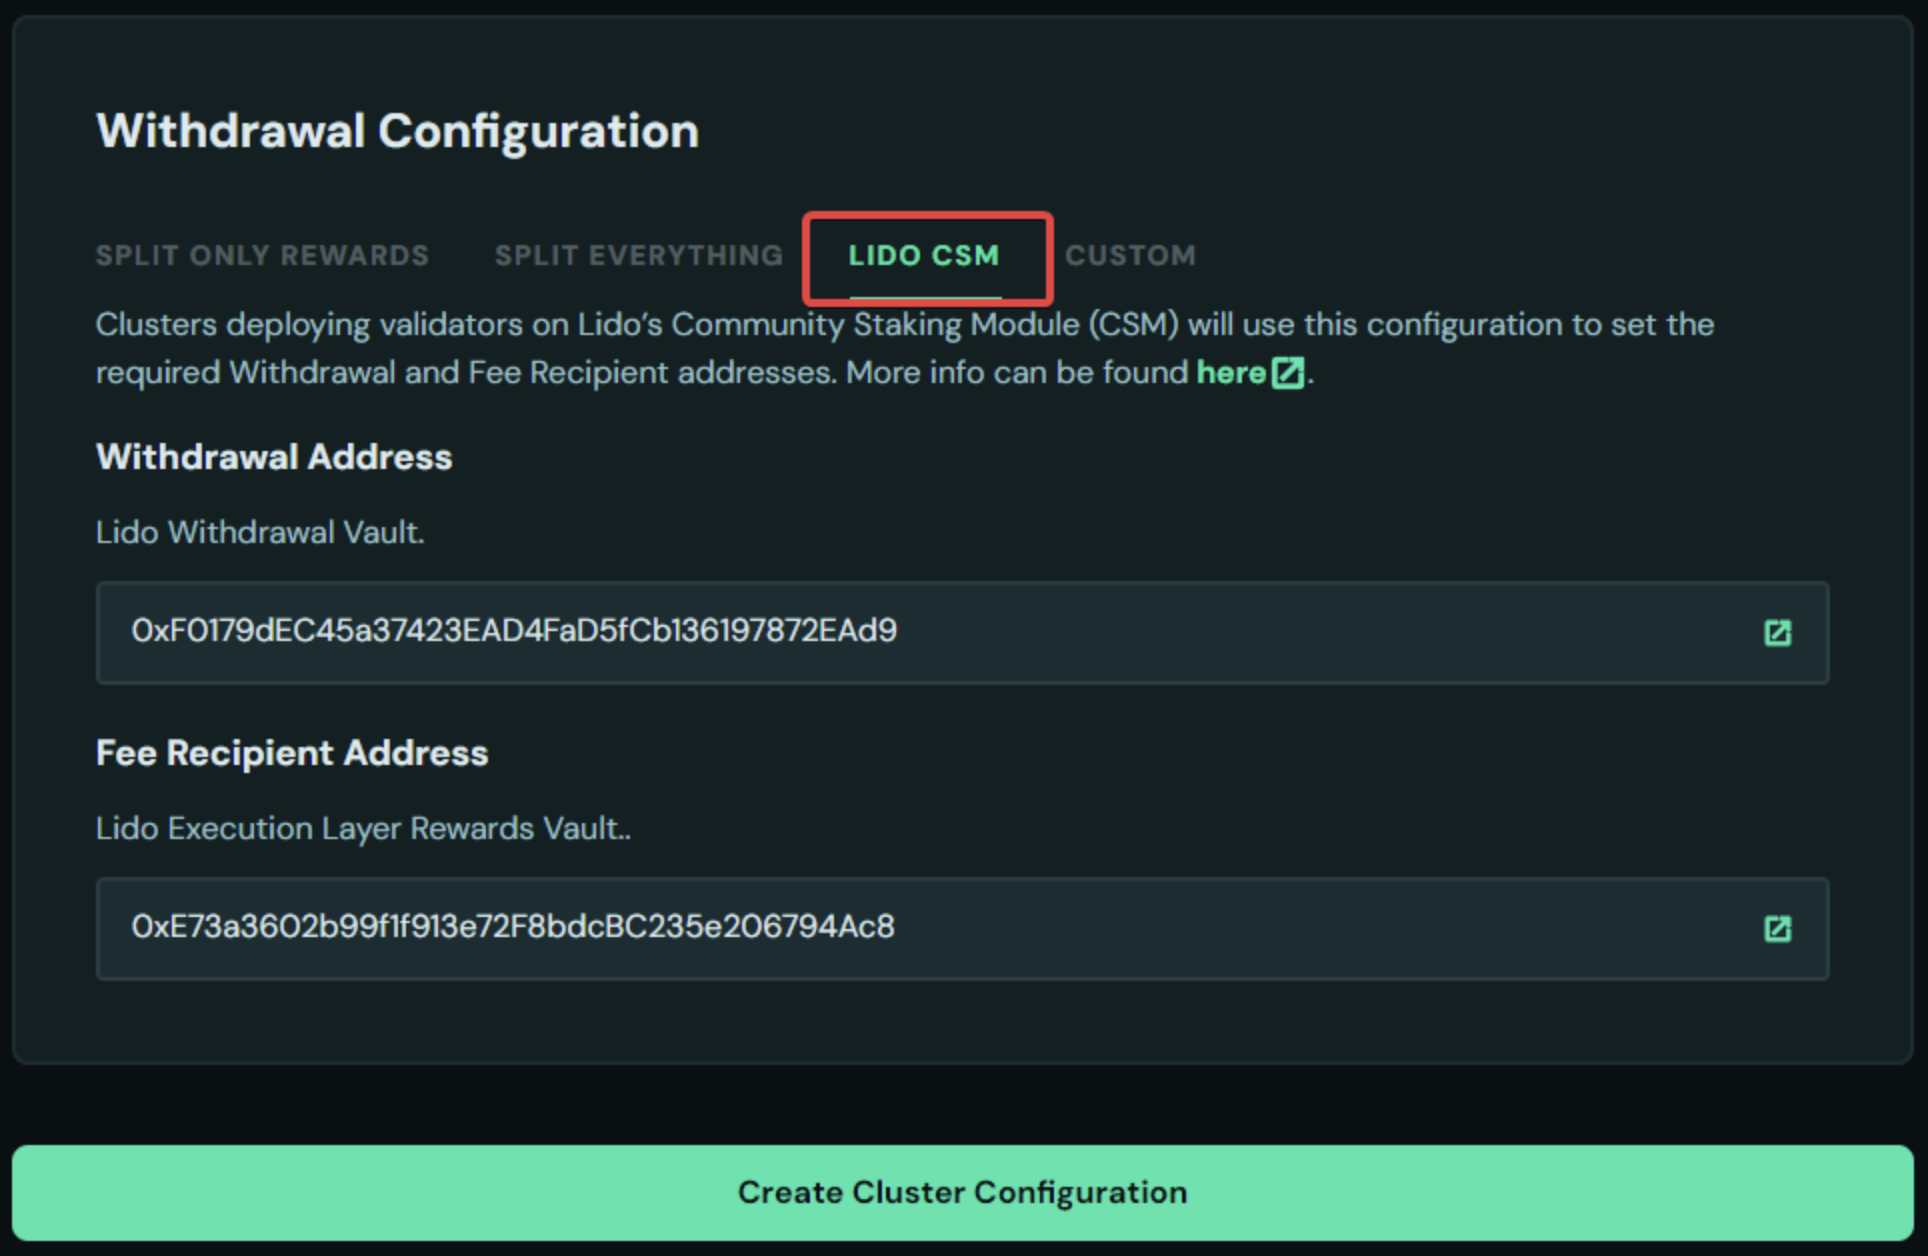
- Select Lido CSM tab, this will automatically set the Withdrawal and Fee Recipient to Lido's contracts.
-
Share the cluster configuration link with all members.
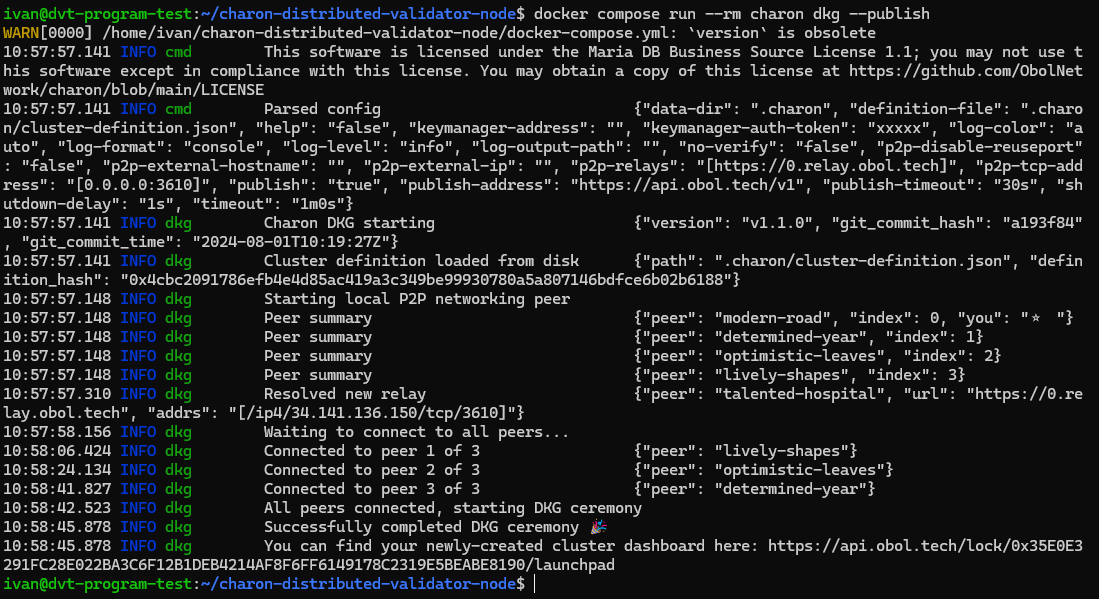
5. Distributed Key Generation (DKG)
- Each member opens the cluster config link, connects wallet, and verifies details.
- Submit ENR and confirm configuration.
- Wait for all members to accept.
- Once ready, run the CLI command provided. After completion, you will have:
cluster-lock.jsonin the.charonfolderdeposit-data.jsonfor depositsvalidator_keys/folder with partial key shares Back up the.charonfolder securely. Validator keys cannot be recreated.
6. Configure MEV-Boost
MEV-Boost is required for all CSM operators.
- Edit the
.envfile and change:
BUILDER_API_ENABLED=true # This is usually at the top of the .env file
MEVBOOST_RELAYS=<vetted Lido relay URLs> # This is in the MEV-Boost section
- Use only Lido-vetted relays
- All operators must use the same relay set.
7. Start the Node
To start the node run the following command:
docker compose up -d
Execution & consensus clients will sync. Charon + validator client will wait for activation.
8. Upload keys
To upload keys to Lido CSM as an Obol DV cluster, do the following:
- Create a Node Operator in the Lido CSM Widget using Extended Mode (as described here).
- Manager Address → your Safe multi-sig
- Rewards Address → your Splitter contract
- Upload
deposit_data.jsonfor the validators and provide the required bond as described in this section of the guide.
9. Exit Validators
If you want to exit one or all of the validators in the cluster, the majority of the cluster needs to run the following commands:
Exit a specific validator
docker exec -it charon-distributed-validator-node-charon-1 /bin/sh -c 'charon exit sign \
--beacon-node-endpoints="http://lighthouse:5052" \
--validator-public-key="<VALIDATOR_PUBLIC_KEY>" \
--exit-epoch=194048'
Exit all validators
docker exec -it charon-distributed-validator-node-charon-1 /bin/sh -c 'charon exit sign \
--beacon-node-endpoints="http://lighthouse:5052" \
--all \
--exit-epoch=194048'
Once a validator has broadcasted an exit message, it must continue to validate for at least 27 hours or longer. Do not shut off your distributed validator nodes until your validator is fully exited.