🤖 Set up MEV-Boost
If you're looking for a complete set up of your node head to the Node Setup section.
Dappnode
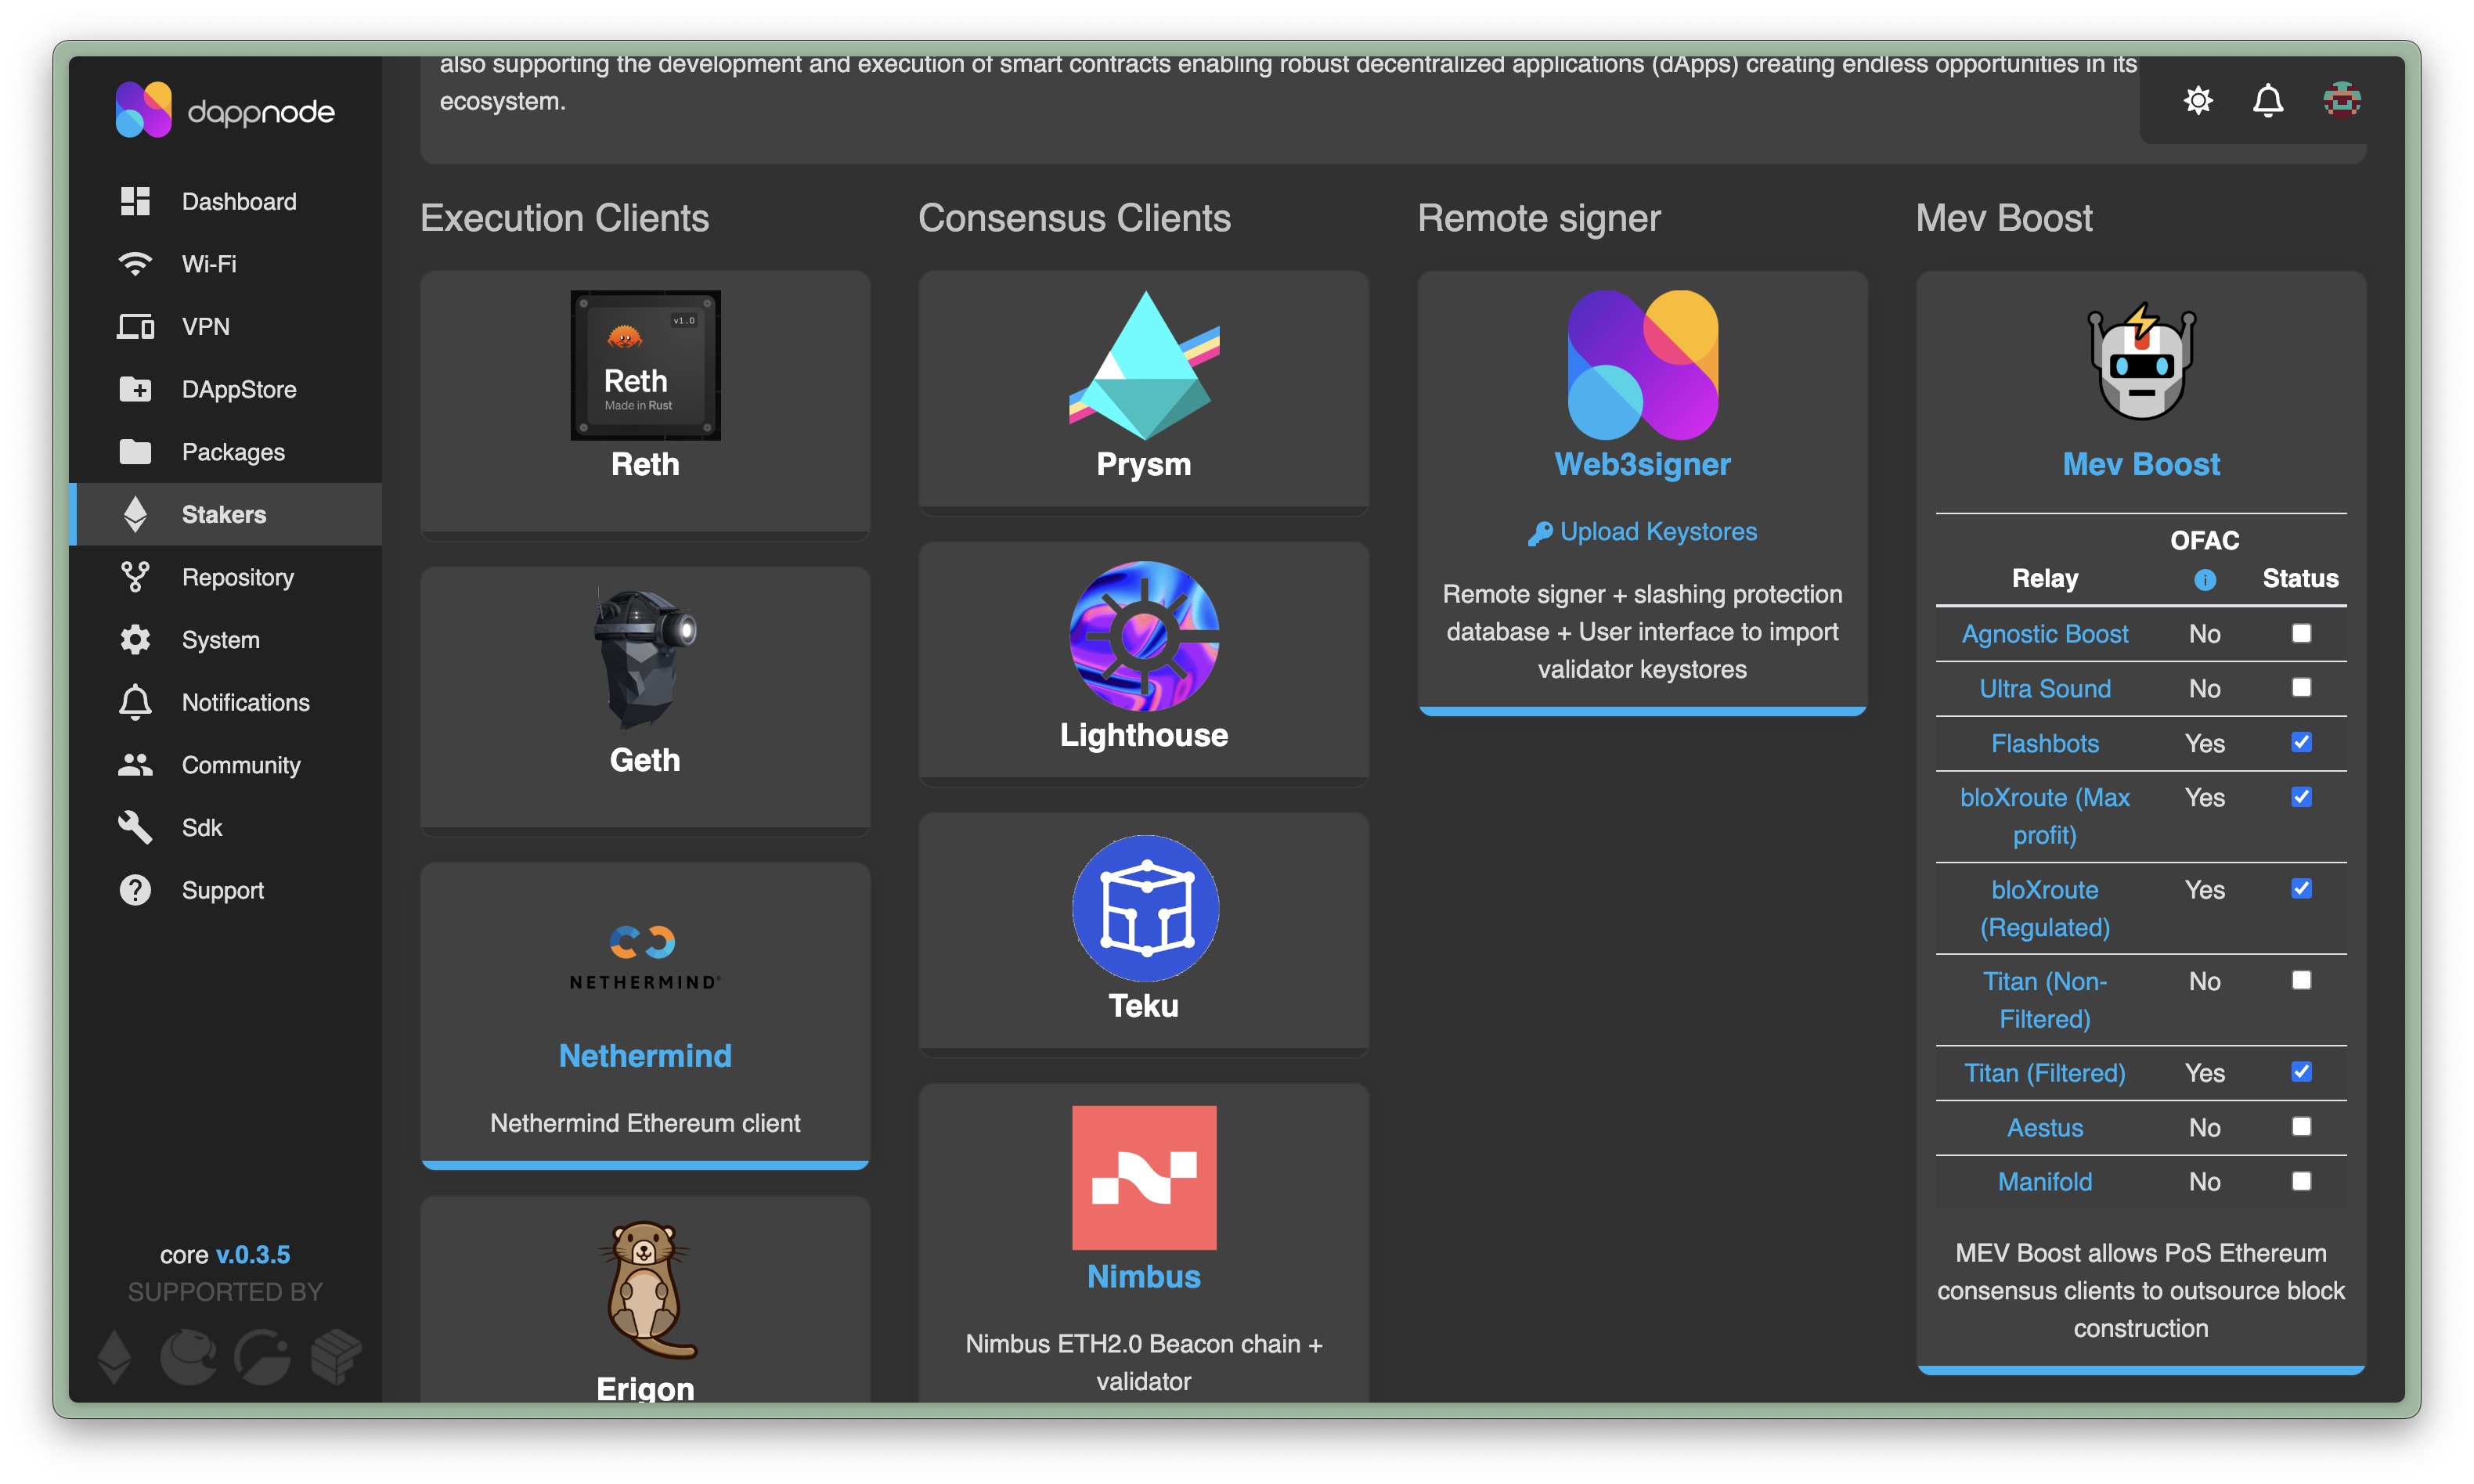
To install or modify MEV Boost in your Dappnode setup, head to the Stakers tab and choose relays from:
-
Mainnet: Mainnet Active + Vetted tab
-
Testnet: Hoodi tab
For mainnet operators:
- You can only use relays marked with "must use some" and "may use" tags
- You must use at least some relays marked with "must use some" tag
- Do not use any relays that are not in the list
EthPillar
If you selected 3. Lido CSM Staking Node via the Terminal UI (TUI) and followed the setup flow, the MEV Boost service should automatically be included in your systemd stack with the following 6 MEV relays selected (for Mainnet).
    -relay https://0xa15b52576bcbf1072f4a011c0f99f9fb6c66f3e1ff321f11f461d15e31b1cb359caa092c71bbded0bae5b5ea401aab7e@aestus.live \
    -relay https://0xa7ab7a996c8584251c8f925da3170bdfd6ebc75d50f5ddc4050a6fdc77f2a3b5fce2cc750d0865e05d7228af97d69561@agnostic-relay.net \
    -relay https://0x8b5d2e73e2a3a55c6c87b8b6eb92e0149a125c852751db1422fa951e42a09b82c142c3ea98d0d9930b056a3bc9896b8f@bloxroute.max-profit.blxrbdn.com \
    -relay https://0xb0b07cd0abef743db4260b0ed50619cf6ad4d82064cb4fbec9d3ec530f7c5e6793d9f286c4e082c0244ffb9f2658fe88@bloxroute.regulated.blxrbdn.com \
    -relay https://0xac6e77dfe25ecd6110b8e780608cce0dab71fdd5ebea22a16c0205200f2f8e2e3ad3b71d3499c54ad14d6c21b41a37ae@boost-relay.flashbots.net \
    -relay https://0xa1559ace749633b997cb3fdacffb890aeebdb0f5a3b6aaa7eeeaf1a38af0a8fe88b9e4b1f61f236d2e64d95733327a62@relay.ultrasound.money
Adding MEV Boost Separately
Run ethpillar on your terminal to activate the TUI.
Select 5. MEV-Boost >> 5. Edit configuration.
Add MEV Relays using the -relay flag and ending with a " " for each line. Refer to the allowed MEV relays according to your network (Mainnet vs Testnet):
-
Mainnet: Mainnet Active + Vetted tab
-
Testnet: Hoodi tab
For mainnet operators:
- You can only use relays marked with "must use some" and "may use" tags
- You must use at least some relays marked with "must use some" tag
- Do not use any relays that are not in the list
Mainnet Example:
[Unit]
Description=MEV-Boost Service for MAINNET
Wants=network-online.target
After=network-online.target
Documentation=https://www.coincashew.com

[Service]
User=mevboost
Group=mevboost
Type=simple
Restart=always
RestartSec=5
ExecStart=/usr/local/bin/mev-boost \
    -mainnet \
    -min-bid 0.07 \
    -relay-check \
    -relay https://0xa15b52576bcbf1072f4a011c0f99f9fb6c66f3e1ff321f11f461d15e31b1cb359caa092c71bbded0bae5b5ea401aab7e@aestus.live \
    -relay https://0xa7ab7a996c8584251c8f925da3170bdfd6ebc75d50f5ddc4050a6fdc77f2a3b5fce2cc750d0865e05d7228af97d69561@agnostic-relay.net \
    -relay https://0x8b5d2e73e2a3a55c6c87b8b6eb92e0149a125c852751db1422fa951e42a09b82c142c3ea98d0d9930b056a3bc9896b8f@bloxroute.max-profit.blxrbdn.com \
    -relay https://0xb0b07cd0abef743db4260b0ed50619cf6ad4d82064cb4fbec9d3ec530f7c5e6793d9f286c4e082c0244ffb9f2658fe88@bloxroute.regulated.blxrbdn.com \
    -relay https://0xac6e77dfe25ecd6110b8e780608cce0dab71fdd5ebea22a16c0205200f2f8e2e3ad3b71d3499c54ad14d6c21b41a37ae@boost-relay.flashbots.net \
    -relay https://0xa1559ace749633b997cb3fdacffb890aeebdb0f5a3b6aaa7eeeaf1a38af0a8fe88b9e4b1f61f236d2e64d95733327a62@relay.ultrasound.money

[Install]
WantedBy=multi-user.target
Stereum
Whether through manual or 1-click setup, the Stereum launcher installs MEV Boost by default. Follow these steps if you want to change your relays or install MEV Boost.
Refer to the allowed MEV relays according to your network (Mainnet vs Testnet):
-
Mainnet: Mainnet Active + Vetted tab
-
Testnet: Hoodi tab
For mainnet operators:
- You can only use relays marked with "must use some" and "may use" tags
- You must use at least some relays marked with "must use some" tag
- Do not use any relays that are not in the list
- If you have MEV Boost installed but you want to change the relays, open MEV Boost in Stereum by clicking on the logo at the top as shown in the image below.
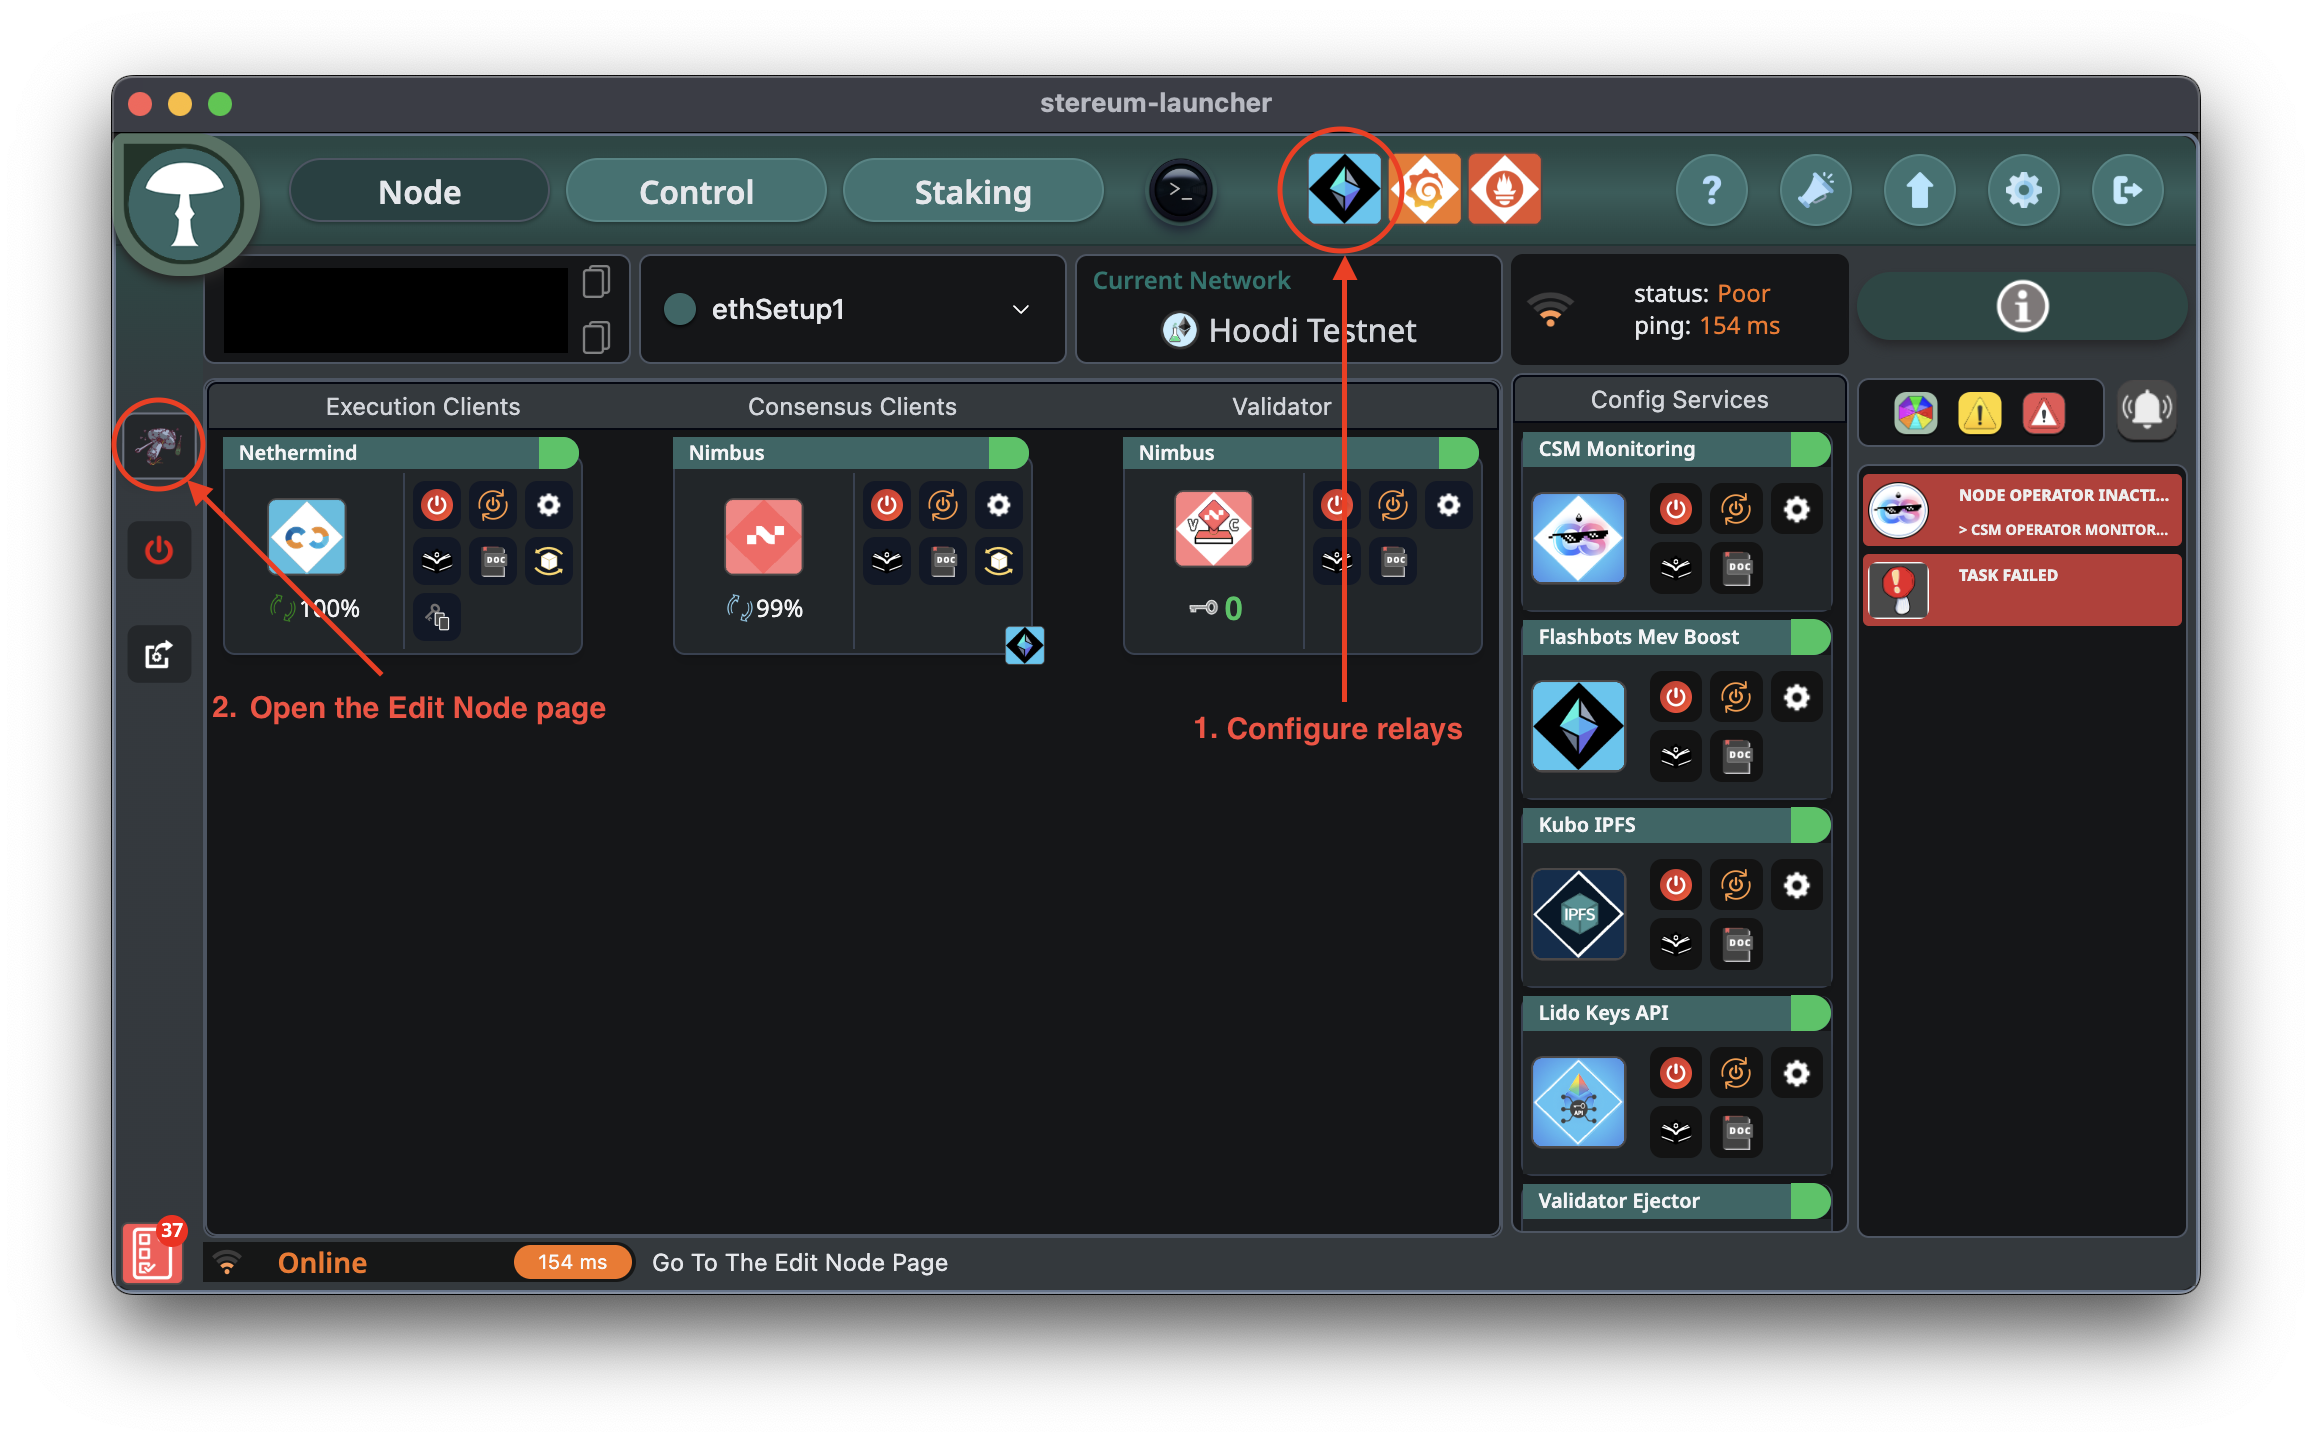
- If you don't have MEV Boost installed, open the Edit Node page as shown above, then open the setup and look search for the Flashbots MEV Boost service in the services bar at the right. Check the installation path, the relays and confirm the changes to install it.

Sedge
If you followed the steps on our Sedge section, MEV Boost should be installed with the following list of MEV relays selected (for Mainnet).
RELAY_URLS=https://0xa7ab7a996c8584251c8f925da3170bdfd6ebc75d50f5ddc4050a6fdc77f2a3b5fce2cc750d0865e05d7228af97d69561@agnostic-relay.net,https://0xb0b07cd0abef743db4260b0ed50619cf6ad4d82064cb4fbec9d3ec530f7c5e6793d9f286c4e082c0244ffb9f2658fe88@bloxroute.regulated.blxrbdn.com,https://0xa15b52576bcbf1072f4a011c0f99f9fb6c66f3e1ff321f11f461d15e31b1cb359caa092c71bbded0bae5b5ea401aab7e@aestus.live,https://0x8b5d2e73e2a3a55c6c87b8b6eb92e0149a125c852751db1422fa951e42a09b82c142c3ea98d0d9930b056a3bc9896b8f@bloxroute.max-profit.blxrbdn.com,https://0xac6e77dfe25ecd6110b8e780608cce0dab71fdd5ebea22a16c0205200f2f8e2e3ad3b71d3499c54ad14d6c21b41a37ae@boost-relay.flashbots.net,https://0xa1559ace749633b997cb3fdacffb890aeebdb0f5a3b6aaa7eeeaf1a38af0a8fe88b9e4b1f61f236d2e64d95733327a62@relay.ultrasound.money,https://0x8c4ed5e24fe5c6ae21018437bde147693f68cda427cd1122cf20819c30eda7ed74f72dece09bb313f2a1855595ab677d@regional.titanrelay.xyz,https://0x8c4ed5e24fe5c6ae21018437bde147693f68cda427cd1122cf20819c30eda7ed74f72dece09bb313f2a1855595ab677d@global.titanrelay.xyz,https://0x98650451ba02064f7b000f5768cf0cf4d4e492317d82871bdc87ef841a0743f69f0f1eea11168503240ac35d101c9135@mainnet-relay.securerpc.com/
Adding MEV Boost Separately
To add the service alone, you can run sedge generate mev-boost --relay-urls= followed by the relay urls separated by comma. Find the Lido-vetted list here:
-
Mainnet: Mainnet Active + Vetted tab
-
Testnet: Hoodi tab
For mainnet operators:
- You can only use relays marked with "must use some" and "may use" tags
- You must use at least some relays marked with "must use some" tag
- Do not use any relays that are not in the list
Mainnet Example:
sedge generate mev-boost --relay-urls=https://0xa15b52576bcbf1072f4a011c0f99f9fb6c66f3e1ff321f11f461d15e31b1cb359caa092c71bbded0bae5b5ea401aab7e@aestus.live,https://0xa7ab7a996c8584251c8f925da3170bdfd6ebc75d50f5ddc4050a6fdc77f2a3b5fce2cc750d0865e05d7228af97d69561@agnostic-relay.net,https://0x8b5d2e73e2a3a55c6c87b8b6eb92e0149a125c852751db1422fa951e42a09b82c142c3ea98d0d9930b056a3bc9896b8f@bloxroute.max-profit.blxrbdn.com,https://0xb0b07cd0abef743db4260b0ed50619cf6ad4d82064cb4fbec9d3ec530f7c5e6793d9f286c4e082c0244ffb9f2658fe88@bloxroute.regulated.blxrbdn.com,https://0xac6e77dfe25ecd6110b8e780608cce0dab71fdd5ebea22a16c0205200f2f8e2e3ad3b71d3499c54ad14d6c21b41a37ae@boost-relay.flashbots.net,https://0xa1559ace749633b997cb3fdacffb890aeebdb0f5a3b6aaa7eeeaf1a38af0a8fe88b9e4b1f61f236d2e64d95733327a62@relay.ultrasound.money
Eth Docker
If you selected the Lido Compatible Node >> CSM Node option and followed the Terminal UI setup flow, the MEV Boost service should automatically be included in your docker compose stack with the 4 following MEV relays selected.
Adding MEV Boost separately
Edit the .env file.
sudo nano ~/eth-docker/.env
- Ensure that
:mev-boost.ymlis added to theCOMPOSE_FILE=line (the very first uncommented line).
-
Add MEV Relays to the
MEV_RELAYS=line, use commas without spaces to delimit multiple relay endpoints. Refer to the allowed MEV relays according to your network (Mainnet vs Testnet):- Mainnet: Mainnet Active + Vetted tab
- Testnet: Hoodi tab
For mainnet operators:
- You can only use relays marked with "must use some" and "may use" tags
- You must use at least some relays marked with "must use some" tag
- Do not use any relays that are not in the list
Mainnet Example:
MEV_RELAYS=https://0xb0b07cd0abef743db4260b0ed50619cf6ad4d82064cb4fbec9d3ec530f7c5e6793d9f286c4e082c0244ffb9f2658fe88@bloxroute.regulated.blxrbdn.com,https://0xa7ab7a996c8584251c8f925da3170bdfd6ebc75d50f5ddc4050a6fdc77f2a3b5fce2cc750d0865e05d7228af97d69561@agnostic-relay.net,https://0x8b5d2e73e2a3a55c6c87b8b6eb92e0149a125c852751db1422fa951e42a09b82c142c3ea98d0d9930b056a3bc9896b8f@bloxroute.max-profit.blxrbdn.com,https://0xac6e77dfe25ecd6110b8e780608cce0dab71fdd5ebea22a16c0205200f2f8e2e3ad3b71d3499c54ad14d6c21b41a37ae@boost-relay.flashbots.net,https://0xa15b52576bcbf1072f4a011c0f99f9fb6c66f3e1ff321f11f461d15e31b1cb359caa092c71bbded0bae5b5ea401aab7e@aestus.live,https://0xa1559ace749633b997cb3fdacffb890aeebdb0f5a3b6aaa7eeeaf1a38af0a8fe88b9e4b1f61f236d2e64d95733327a62@relay.ultrasound.money
Systemd
Refer to the allowed MEV relays according to your network (Mainnet vs Testnet):
- Mainnet: Mainnet Active + Vetted tab
- Testnet: Hoodi tab
For mainnet operators:
- You can only use relays marked with "must use some" and "may use" tags
- You must use at least some relays marked with "must use some" tag
- Do not use any relays that are not in the list
Ethereum on ARM
Refer to the allowed MEV relays according to your network (Mainnet vs Testnet):
- Mainnet: Mainnet Active + Vetted tab
- Testnet: Hoodi tab
For mainnet operators:
- You can only use relays marked with "must use some" and "may use" tags
- You must use at least some relays marked with "must use some" tag
- Do not use any relays that are not in the list